


Welcome to part 5 in my 7-part introductory series on Machine Learning and Data Science.
Be sure to check out the other parts in the series, as they all lead into each other:
- Part 1: A 6-Step Framework To Tackle Machine Learning Projects
- Part 2: Introduction to NumPy + Python
- Part 3: Introduction to Pandas + Python
- Part 4: Introduction to Matplotlib
- Part 5: Introduction to Scikit-Learn (Which is what you're reading right now)
- Part 6: Introduction to Deep Learning with TensorFlow
- Part 7: Communicating & Sharing Your Work as a Machine Learning Engineer / Data Scientist
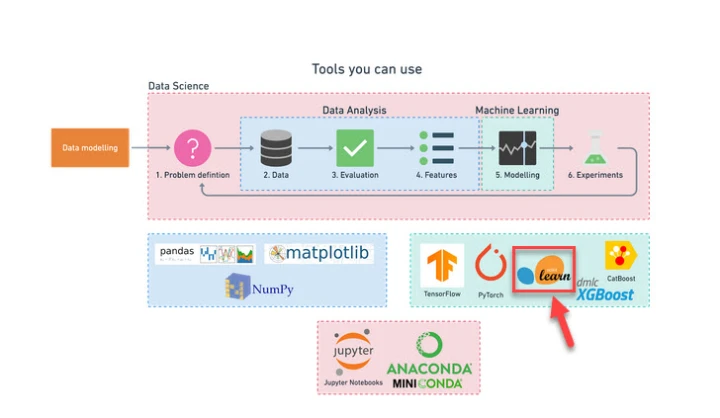
What is Scikit-Learn?
Scikit-Learn, also referred to as sklearn, is an open-source Python Machine Learning library.
It's built on top of NumPy, which is a Python library for numerical computing, and Matplotlib, which is a Python library for data visualization.
Why use Scikit-Learn?
Although the fields of Data Science and Machine Learning are vast, the main goal for most projects is finding patterns within data and then using those patterns to make predictions.
It’s not the only common theme though. There are also certain categories which a majority of problems fall into.
For example
- If you're trying to create a machine learning model to predict whether an email is spam or not spam, you're working on a classification problem (whether something is one thing or another)
- If you're trying to create a machine learning model to predict the price of houses given their characteristics, you're working on a regression problem (predicting a number)
- Or, if you're trying to get a machine learning algorithm to group together similar samples (that you don't necessarily know which should go together), you're working on a clustering problem
Then, once you know what kind of problem you're working on, there are also similar steps you'll take for each:
- Splitting the data into different sets, with one for your machine learning algorithms to learn on (the training set) and another to test them on (the testing set)
- And then choosing a machine learning model and evaluating whether or not your model has learned anything
Scikit-Learn offers Python implementations for doing all of these kinds of tasks (from preparing data to modeling data), saving you from having to build them from scratch, while also being applicable to multiple areas of focus.
What this article covers
The Scikit-Learn library is very capable, but also insanely huge to cover in a single guide. I have a larger version of this post on my personal blog here, but be warned, it's 185 pages long and that’s still not covering every detail.
The good news, however, is that you don’t need to learn everything about this tool before you can use it. Instead, we’re going to focus on some of the main use cases of the Scikit-Learn library, so you can get started using it ASAP.
More specifically, we'll cover a mile-high overview of an end-to-end Scikit-Learn workflow.
This means that after going through this article, you'll have the base knowledge of Scikit-Learn that you need to keep moving forward.
Sidenote: If you want to deep dive into Machine Learning and these tools even further, then check out my complete Machine Learning and Data Science course or watch the first few videos for free.

It’s one of the most popular, highly rated Machine Learning and Data Science bootcamps online, as well as the most modern and up-to-date. Guaranteed.
You'll go from a complete beginner with no prior experience to getting hired as a Machine Learning Engineer this year, so it’s helpful for ML Engineers of all experience levels.
Want a sample of the course? Well check out the video below!:
Why listen to me?
My name is Daniel Bourke, and I'm the resident Machine Learning instructor here at Zero To Mastery.
Originally self-taught, I worked for one of Australia's fastest-growing artificial intelligence agencies, Max Kelsen, and have worked on Machine Learning and data problems across a wide range of industries including healthcare, eCommerce, finance, retail, and more.
I'm also the author of Machine Learning Monthly, write my own blog on my experiments in ML, and run my own YouTube channel - which has hit over 8 Million views.
Phew!
With all that out of the way, let’s get to visualizing some data!
Let's get started.
Import libraries from previous chapters of this guide
First we'll import the libraries we've been using previously in other chapters of this guide, as well as check the version of sklearn that we’re using:
Input
# Standard imports
# %matplotlib inline # No longer required in newer versions of Jupyter (2022+)
import matplotlib.pyplot as plt
import numpy as np
import pandas as pd
import sklearn
print(f"Using Scikit-Learn version: {sklearn.__version__} (materials in this guide require this version or newer).")
Output Using Scikit-Learn version: 1.3.1 (materials in this guide require this version or newer).
Alright. We have the dataset, and we’re running the latest version of Scikit-Learn. Now let’s get into how to use it.
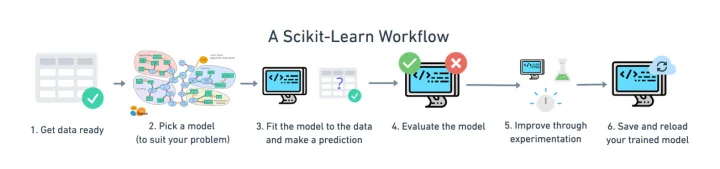
An end-to-end Scikit-Learn workflow
Here’s the mile-high overview of each step:
- Get the data ready (split into features and labels, prepare train and test steps)
- Choose a model for our problem
- Fit the model to the data and use it to make a prediction
- Evaluate the model
- Experiment to improve
- Save a model for someone else to use
So let’s work through an example of this from start to finish.
Workflow Example: Random Forest Classifier for Classifying Heart Disease
Step 1. Get the data ready
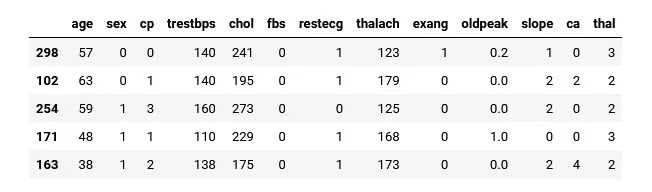
As an example dataset, we'll import heart-disease.csv.
This file contains anonymized patient medical records that focus on whether or not a section of patients has heart disease or not, and then we can use it to look for patterns.
(Side note: this is a classification problem since we're trying to predict whether something is one thing or another. Do they have it or not?).
import pandas as pd
heart_disease = pd.read_csv('../data/heart-disease.csv')
heart_disease.head()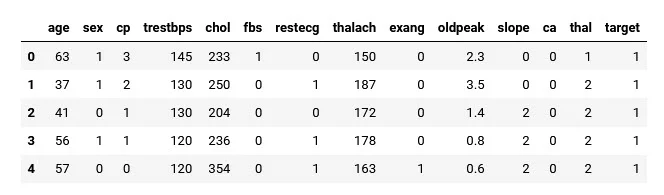
Here, each row is a different patient and all columns except target are different patient characteristics.
The target column indicates whether the patient has heart disease (target=1) or not (target=0).
This is our "label" column and is the variable we're going to try and predict. The rest of the columns (often called features) are what we'll be using to predict the target value.
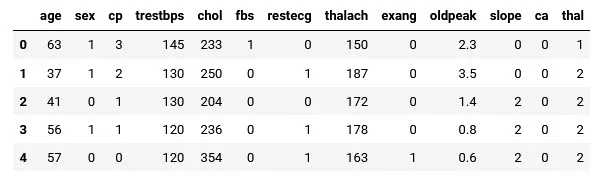
Note: It's a common custom to save features to a variable
Xand labels to a variabley. In practice, we'd like to use theX(features) to build a predictive algorithm to predict they(labels).
Input
# Create X (all the feature columns)
X = heart_disease.drop("target", axis=1)

# Create y (the target column)
y = heart_disease["target"]

# Check the head of the features DataFrame
X.head()
Output
Input
# Check the head and the value counts of the labels
y.head(), y.value_counts()
Output
(0 1
1 1
2 1
3 1
4 1
Name: target, dtype: int64,
target
1 165
0 138
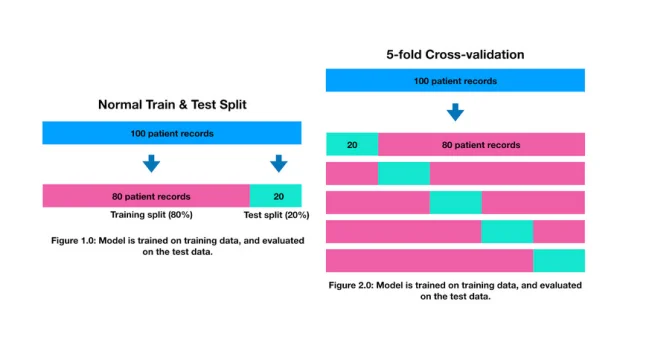
Name: count, dtype: int64)One of the most important practices in Machine Learning is to split datasets into training and test sets.
This way, a model will train on the training set to learn patterns, and then those patterns can be evaluated on the test set.
It’s important that a model never sees testing data during training. This is equivalent to a student studying course materials during the semester (training set) and then testing their abilities on the following exam (testing set).
Scikit-learn provides the sklearn.model_selection.train_test_split method to split datasets in training and test sets.
Note: A common practice to use an 80/20 or 70/30 or 75/25 split for training/testing data. There is also a third set, known as a validation set (e.g. 70/15/15 for training/validation/test) for hyperparameter tuning, but for now we'll focus on training and test sets.
# Split the data into training and test sets
from sklearn.model_selection import train_test_split

X_train, X_test, y_train, y_test = train_test_split(X,
                                                    y,
                                                    test_size=0.25) # by default train_test_split uses 25% of the data for the test set

X_train.shape, X_test.shape, y_train.shape, y_test.shape
Output
((227, 13), (76, 13), (227,), (76,))Step 2. Choose the model and hyperparameters
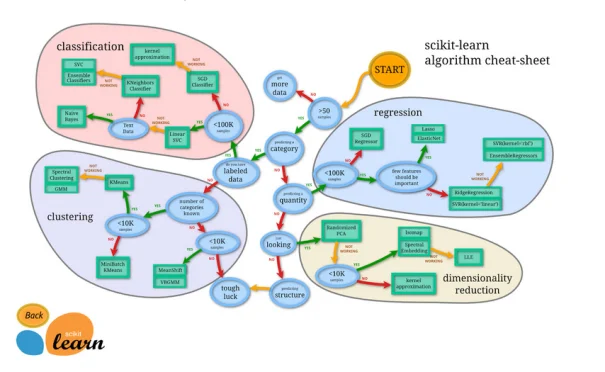
Choosing a model often depends on the type of problem you're working on.
For example, there are different models that Scikit-Learn recommends whether you're working on a classification or regression problem.
(You can see a map breaking down the different kinds of model options and recommendations in the Scikit-Learn documentation).
Scikit-Learn refers to models as "estimators", however, they are also referred to as either a model or clf (short for classifier).
A model's hyperparameters are settings you can change to adjust it for your problem, much like knobs on an oven you can tune to cook your favorite dish.
Since we're working on a classification problem, we'll start with a RandomForestClassifier.
from sklearn.ensemble import RandomForestClassifier
clf = RandomForestClassifier()
We can see the current hyperparameters of a model with the get_params() method.
# View the current hyperparameters
clf.get_params()
Output
{'bootstrap': True,
 'ccp_alpha': 0.0,
 'class_weight': None,
 'criterion': 'gini',
 'max_depth': None,
 'max_features': 'sqrt',
 'max_leaf_nodes': None,
 'max_samples': None,
 'min_impurity_decrease': 0.0,
 'min_samples_leaf': 1,
 'min_samples_split': 2,
 'min_weight_fraction_leaf': 0.0,
 'n_estimators': 100,
 'n_jobs': None,
 'oob_score': False,
 'random_state': None,
 'verbose': 0,
 'warm_start': False}
We'll leave this as is for now, as Scikit-Learn models generally have good default settings.
Step 3. Fit the model to the data and use it to make a prediction
Fitting a model to a dataset involves passing the data and asking it to figure out the patterns.
Such as:
- If there are labels (supervised learning), then the model tries to work out the relationship between the data and the labels
- Or, if there are no labels (unsupervised learning), the model tries to find patterns and group similar samples together
Most Scikit-Learn models have the fit(X,y) method built-in, where the X parameter is the features and the y parameter is the labels.
In our case, we start by fitting a model on the training split (X_train, y_train).
clf.fit(X=X_train, y=y_train)Output

Using the model to make a prediction
The whole point of training a machine learning model is to use it to make some kind of prediction in the future.
Once your model instance is trained, you can use the predict() method to predict a target value given a set of features. In other words, use the model, along with some new, unseen, and unlabelled data to predict the label.
Note: Data you predict on should be in the same shape and format as data you trained on.
For example
The following data doesn't work, because it has incorrect shapes:
y_label = clf.predict(np.array([0, 2, 3, 4]))Output
/Users/daniel/code/zero-to-mastery-ml/env/lib/python3.10/site-packages/sklearn/base.py:465: UserWarning: X does not have valid feature names, but RandomForestClassifier was fitted with feature names
  warnings.warn(
---------------------------------------------------------------------------
ValueError                                Traceback (most recent call last)
/Users/daniel/code/zero-to-mastery-ml/section-2-data-science-and-ml-tools/introduction-to-scikit-learn.ipynb Cell 24 line 2
      <a href='vscode-notebook-cell:/Users/daniel/code/zero-to-mastery-ml/section-2-data-science-and-ml-tools/introduction-to-scikit-learn.ipynb#X32sZmlsZQ%3D%3D?line=0'>1</a> # This doesn't work... incorrect shapes
----> <a href='vscode-notebook-cell:/Users/daniel/code/zero-to-mastery-ml/section-2-data-science-and-ml-tools/introduction-to-scikit-learn.ipynb#X32sZmlsZQ%3D%3D?line=1'>2</a> y_label = clf.predict(np.array([0, 2, 3, 4]))

File ~/code/zero-to-mastery-ml/env/lib/python3.10/site-packages/sklearn/ensemble/_forest.py:823, in ForestClassifier.predict(self, X)
    802 def predict(self, X):
    803     """
    804     Predict class for X.
    805
   (...)
    821         The predicted classes.
    822     """
--> 823     proba = self.predict_proba(X)
    825     if self.n_outputs_ == 1:
    826         return self.classes_.take(np.argmax(proba, axis=1), axis=0)

File ~/code/zero-to-mastery-ml/env/lib/python3.10/site-packages/sklearn/ensemble/_forest.py:865, in ForestClassifier.predict_proba(self, X)
    863 check_is_fitted(self)
    864 # Check data
--> 865 X = self._validate_X_predict(X)
    867 # Assign chunk of trees to jobs
    868 n_jobs, _, _ = _partition_estimators(self.n_estimators, self.n_jobs)

File ~/code/zero-to-mastery-ml/env/lib/python3.10/site-packages/sklearn/ensemble/_forest.py:599, in BaseForest._validate_X_predict(self, X)
    596 """
    597 Validate X whenever one tries to predict, apply, predict_proba."""
    598 check_is_fitted(self)
--> 599 X = self._validate_data(X, dtype=DTYPE, accept_sparse="csr", reset=False)
    600 if issparse(X) and (X.indices.dtype != np.intc or X.indptr.dtype != np.intc):
    601     raise ValueError("No support for np.int64 index based sparse matrices")

File ~/code/zero-to-mastery-ml/env/lib/python3.10/site-packages/sklearn/base.py:605, in BaseEstimator._validate_data(self, X, y, reset, validate_separately, cast_to_ndarray, **check_params)
    603         out = X, y
    604 elif not no_val_X and no_val_y:
--> 605     out = check_array(X, input_name="X", **check_params)
    606 elif no_val_X and not no_val_y:
    607     out = _check_y(y, **check_params)

File ~/code/zero-to-mastery-ml/env/lib/python3.10/site-packages/sklearn/utils/validation.py:938, in check_array(array, accept_sparse, accept_large_sparse, dtype, order, copy, force_all_finite, ensure_2d, allow_nd, ensure_min_samples, ensure_min_features, estimator, input_name)
    936     # If input is 1D raise error
    937     if array.ndim == 1:
--> 938         raise ValueError(
    939             "Expected 2D array, got 1D array instead:\narray={}.\n"
    940             "Reshape your data either using array.reshape(-1, 1) if "
    941             "your data has a single feature or array.reshape(1, -1) "
    942             "if it contains a single sample.".format(array)
    943         )
    945 if dtype_numeric and hasattr(array.dtype, "kind") and array.dtype.kind in "USV":
    946     raise ValueError(
    947         "dtype='numeric' is not compatible with arrays of bytes/strings."
    948         "Convert your data to numeric values explicitly instead."
    949     )

ValueError: Expected 2D array, got 1D array instead:
array=[0. 2. 3. 4.].
Reshape your data either using array.reshape(-1, 1) if your data has a single feature or array.reshape(1, -1) if it contains a single sample.
How can we fix this?
Well, since our model was trained on data from X_train, our predictions should be made on data in the same format and shape as X_train.
Remember: Our goal in many machine learning problems is to use patterns learned from the training data to make predictions on the test data (or future unseen data). This is why it has to match.
And so in order to predict a label, data has to be in the same shape as X_train, like so:
X_test.head()Output
Now, we can use the model to make a prediction on the test data (further evaluation)
y_preds = clf.predict(X=X_test)Step 4. Evaluate the model
Now that we've made some predictions, we can start to use some more Scikit-Learn methods to figure out how good our model is.
What do I mean?
Well, each model or estimator has a built-in score() method. This method compares how well the model was able to learn the patterns between the features and labels.
The score() method for each model uses a standard evaluation metric to measure your model's results.
In the case of a classifier (our model), one of the most common evaluation metrics is accuracy (i.e. the fraction of correct predictions out of total predictions).
Let's check out our model's accuracy on the training set.
# Evaluate the model on the training set
train_acc = clf.score(X=X_train, y=y_train)
print(f"The model's accuracy on the training dataset is: {train_acc*100}%")
Output
The model's accuracy on the training dataset is: 100.0%Woah! Our model does pretty well on the training dataset, mainly because it has a chance to see both data and labels, so how about the test dataset?
# Evaluate the model on the test set
test_acc = clf.score(X=X_test, y=y_test)
print(f"The model's accuracy on the testing dataset is: {test_acc*100:.2f}%")
Output
The model's accuracy on the testing dataset is: 75.00%Hmm, looks like our model's accuracy is a bit less on the test dataset than on the training dataset. This is quite often the case because remember, a model has never seen the testing examples before.
There are also a number of other evaluation methods we can use for our classification models.
All of the following classification metrics come from the sklearn.metrics module:
classification_report(y_true, y_true)- Builds a text report showing various classification metrics such as precision, recall and F1-scoreconfusion_matrix(y_true, y_pred)- Create a confusion matrix to compare predictions to truth labelsaccuracy_score(y_true, y_pred)- Find the accuracy score (the default metric) for a classifier
Each of these metrics compares a model's predictions (y_pred) to truth labels (y_true).
from sklearn.metrics import classification_report, confusion_matrix, accuracy_score
# Create a classification report
print(classification_report(y_test, y_preds))
Output
             precision    recall  f1-score   support

           0       0.81      0.60      0.69        35
           1       0.72      0.88      0.79        41

    accuracy                           0.75        76
   macro avg       0.76      0.74      0.74        76
weighted avg       0.76      0.75      0.74        76
Input
# Create a confusion matrix
conf_mat = confusion_matrix(y_test, y_preds)
conf_mat
Output
array([[21, 14],
       [ 5, 36]])
Input
# Compute the accuracy score (same as the score() method for classifiers)
accuracy_score(y_test, y_preds)
Output
0.75Step 5. Experiment to improve
The first model you build is often referred to as a baseline.
(It’s usually even simpler than the model we've used, a baseline could be "let's just by default predict the most common value and then try to improve").
Once you've got a baseline model, like we have here, it's important to remember that this is often not the final model you'll use.
The next step in the workflow is to try and improve upon your baseline model.
How?
With one of the most important mottos in machine learning - Experiment, experiment, experiment!
Experiments can come in many different forms, but let's break it into two:
- From a model perspective, and
- From a data perspective
From a model perspective, it may involve things such as using a more complex model or tuning your model's hyperparameters.
From a data perspective, it may involve collecting more data or better quality data so your existing model has more of a chance to learn the patterns within.
If you're already working on an existing dataset, it's often easier to try a series of model perspective experiments first and then turn to data perspective experiments if you aren't getting the results you're looking for.
One thing you should be aware of is if you're tuning a model's hyperparameters in a series of experiments, your results should always be cross-validated.
Cross-validation is simply a way of making sure the results you're getting are consistent across your training and test datasets (because it uses multiple versions of training and test sets) rather than just luck because of the order the original training and test sets were created.
- Try different hyperparameters
- All different parameters should be cross-validated
Note: Beware of cross-validation for time series problems, as for time series, you don't want to mix samples from the future with samples from the past.
Different models you use will have different hyperparameters you can tune. For the case of our model, the RandomForestClassifier(), we'll start trying different values for n_estimators (a measure for the number of trees in the random forest).
By default, n_estimators=100, so how about we try values from 100 to 200 and see what happens (generally more is better)?
# Try different numbers of estimators (trees)... (no cross-validation)
np.random.seed(42)
for i in range(100, 200, 10):
    print(f"Trying model with {i} estimators...")
    model = RandomForestClassifier(n_estimators=i).fit(X_train, y_train)
    print(f"Model accuracy on test set: {model.score(X_test, y_test) * 100:.2f}%")
    print("")
Output
Trying model with 100 estimators...
Model accuracy on test set: 73.68%

Trying model with 110 estimators...
Model accuracy on test set: 73.68%

Trying model with 120 estimators...
Model accuracy on test set: 75.00%

Trying model with 130 estimators...
Model accuracy on test set: 72.37%

Trying model with 140 estimators...
Model accuracy on test set: 73.68%

Trying model with 150 estimators...
Model accuracy on test set: 73.68%

Trying model with 160 estimators...
Model accuracy on test set: 73.68%

Trying model with 170 estimators...
Model accuracy on test set: 75.00%

Trying model with 180 estimators...
Model accuracy on test set: 73.68%

Trying model with 190 estimators...
Model accuracy on test set: 75.00%
The metrics above were measured on a single train and test split.
Let's use sklearn.model_selection.cross_val_score to measure the results across 5 different train and test sets.
We can achieve this by setting cross_val_score(X, y, cv=5). Where X is the full feature set, y is the full label set, and cv is the number of train and test splits cross_val_score will automatically create from the data (in our case, 5 different splits, this is known as 5-fold cross-validation).
from sklearn.model_selection import cross_val_score

# With cross-validation
np.random.seed(42)
for i in range(100, 200, 10):
    print(f"Trying model with {i} estimators...")
    model = RandomForestClassifier(n_estimators=i).fit(X_train, y_train)

    # Measure the model score on a single train/test split
    model_score = model.score(X_test, y_test)
    print(f"Model accuracy on single test set split: {model_score * 100:.2f}%")

    # Measure the mean cross-validation score across 5 different train and test splits
    cross_val_mean = np.mean(cross_val_score(model, X, y, cv=5))
    print(f"5-fold cross-validation score: {cross_val_mean * 100:.2f}%")

    print("")
Output
Trying model with 100 estimators...
Model accuracy on single test set split: 73.68%
5-fold cross-validation score: 82.15%

Trying model with 110 estimators...
Model accuracy on single test set split: 73.68%
5-fold cross-validation score: 81.17%

Trying model with 120 estimators...
Model accuracy on single test set split: 75.00%
5-fold cross-validation score: 83.49%

Trying model with 130 estimators...
Model accuracy on single test set split: 72.37%
5-fold cross-validation score: 83.14%

Trying model with 140 estimators...
Model accuracy on single test set split: 73.68%
5-fold cross-validation score: 82.48%

Trying model with 150 estimators...
Model accuracy on single test set split: 73.68%
5-fold cross-validation score: 80.17%

Trying model with 160 estimators...
Model accuracy on single test set split: 71.05%
5-fold cross-validation score: 80.83%

Trying model with 170 estimators...
Model accuracy on single test set split: 73.68%
5-fold cross-validation score: 82.16%

Trying model with 180 estimators...
Model accuracy on single test set split: 72.37%
5-fold cross-validation score: 81.50%

Trying model with 190 estimators...
Model accuracy on single test set split: 72.37%
5-fold cross-validation score: 81.83%
A high cross-validation score is usually a better indicator of a quality model than a single split accuracy score. But rather than set up and track the results of these experiments manually, we can get Scikit-Learn to do the exploration for us.
Scikit-Learn's sklearn.model_selection.GridSearchCV is a handy way to search over a set of different hyperparameter values and automatically track which performs the best.
Let's test it!
# Another way to do it with GridSearchCV...
np.random.seed(42)
from sklearn.model_selection import GridSearchCV

# Define the parameters to search over in dictionary form
# (these can be any of your target model's hyperparameters)
param_grid = {'n_estimators': [i for i in range(100, 200, 10)]}

# Setup the grid search
grid = GridSearchCV(estimator=RandomForestClassifier(),
                    param_grid=param_grid,
                    cv=5,
                    verbose=1)

# Fit the grid search to the data
grid.fit(X, y)

# Find the best parameters
print(f"The best parameter values are: {grid.best_params_}")
print(f"With a score of: {grid.best_score_*100:.2f}%")
Output
Fitting 5 folds for each of 10 candidates, totaling 50 fits
The best parameter values are: {'n_estimators': 120}
With a score of: 82.82%
We can then extract the best model/estimator with the best_estimator_ attribute.
# Set the model to be the best estimator
clf = grid.best_estimator_
Clf
Output
RandomForestClassifier
RandomForestClassifier(n_estimators=120)
And now that we've got the best cross-validated model, we can fit and score it on our original single train/test split of the data.
# Fit the best model
clf = clf.fit(X_train, y_train)

# Find the best model scores on our single test split
# (note: this may be lower than the cross-validation score since it's only on one split of the data)
print(f"Best model score on single split of the data: {clf.score(X_test, y_test)*100:.2f}%")
Output
Best model score on a single split of the data: 75.00%Step 6. Save a model for someone else to use
When you've done a few experiments and you're happy with how your model is doing, you'll likely want someone else to be able to use it.
This may come in the form of a teammate or colleague trying to replicate and validate your results or through a customer using your model as part of a service or application you offer.
Saving a model also allows you to reuse it later without having to go through retraining it. This is especially helpful when your training times start to increase.
You can save a Scikit-Learn model using Python's in-built pickle module.
import pickle
# Save an existing model to file
pickle.dump(model, open("random_forest_model_1.pkl", "wb"))
Then, you can use load and evaluate it:
# Load a saved pickle model and evaluate it
loaded_pickle_model = pickle.load(open("random_forest_model_1.pkl", "rb"))
print(f"Loaded pickle model prediction score: {loaded_pickle_model.score(X_test, y_test) * 100:.2f}%")

Loaded pickle model prediction score: 72.37%
However, for larger models, it may be more efficient to use Joblib.
from joblib import dump, load

# Save a model using joblib
dump(model, "random_forest_model_1.joblib")
Output
['random_forest_model_1.joblib']Input
# Load a saved joblib model and evaluate it
loaded_joblib_model = load("random_forest_model_1.joblib")
print(f"Loaded joblib model prediction score: {loaded_joblib_model.score(X_test, y_test) * 100:.2f}%")
Output
Loaded joblib model prediction score: 72.37%And there you have it. A mile-high overview of a complete Scikit-Learn workflow.
Where to next?
If you've made it this far, congratulations! We've covered a lot of ground in the Scikit-Learn library, and we still only scraped the surface of what’s possible.
But for the time being, you should be equipped with some of the most useful features of the library to start trying to apply them to your own problems.
If you'd like to learn even more about what else the Scikit-Learn library is capable of I'd highly recommend browsing through the Scikit-Learn User Guide and seeing what sparks your interest.
Otherwise, be sure to check out my complete Machine Learning and Data Science course or watch the first few videos for free.
As I said earlier, it’s one of the most popular, highly rated Machine Learning and Data Science bootcamps online, as well as the most modern and up-to-date. Guaranteed.
You can easily go from a complete beginner with no prior experience, to getting hired as a Machine Learning Engineer, so it’s helpful for ML Engineers of all experience levels. Even total beginners or current ML professionals.
Even better? If you have any questions at all, you can ask me directly in our private Discord! There’s a great community of students and working professionals in there, who are happy to help and share their knowledge.


