A website needs to be tremendously easily accessible to become successful these days.
It’s because users want to access your website anywhere, anytime, and on any device. No matter what network coverage is in their region or what network speed they are dependent on, they’re not willing to wait for a slow page load.
For them, it’s nothing easier than launching a favorite native app directly from the home dashboard of their smartphone. But on the other hand, they’re annoyed by constant notifications about incoming app updates.
They are also too lazy to launch a web browser every time, they’d like to visit the app and they’d like to receive push notifications when it’s needed.
Seems like it’s pretty complicated to satisfy today’s users.
On a first glimpse, it seems like a dead-end for web development, because every website runs only in the web browser. But fortunately, here comes the progressive web app (PWA) to the rescue.
I’ll tell you what you really need to know about PWAs and also demonstrate a basic example, how a PWA could be implemented on your website. It’s rather easy.
You can check out the whole GitHub repo here.
What is a Progessive Web App (PWA) and why should you care?
A PWA offers the opportunity to improve the accessibility of the website.
How?
The key benefits of PWA implementation are:
-
The website can be accessed directly from the home dashboard, regardless of the operating system (similar to Android/iOS apps).
-
It uses a memory cache of your web browser to store the data. This significantly shortens the loading time.
-
With some restrictions, it can also work in offline mode.
-
Push notifications are supported (except iOS).
-
PWAs have URLs and, consequently, are indexed by Google. That means customers can easily find a PWA using a search engine.
When I heard about PWAs for the first time, I was really impressed. They could be a real game-changer and serious competition for Android and iOS apps (or also so-called native apps) as well as desktop apps.
Here are some highlights you should be aware of regarding PWAs:
What is the difference between native apps and PWAs?
The main difference is that users don’t need to visit the Play Store/Apple Store to download the app and its updates. It will update automatically to the latest version as soon as a new version is available.
However, there are also a few disadvantages compared to native apps you should be aware of such as no indoor geolocation, limited iOS features, or no consumer data.
Where do PWAs run?
PWAs use a web browser for launching and operating the app. It runs in standalone mode, which hides browser elements.
Are PWA's compatible with all web browsers?
This solution is rather in the early stages of development, so there are still some restrictions in terms of web browser compatibility.
How do I install a PWA on any device?
Users just visit the website and will be prompted to download it directly from there. It’s also possible to upload it to the Google Play Store, but the question is if it’s actually necessary. That depends on your project.
3 factors that you need to consider, if you want to turn your website into a PWA
There are three requirements you must observe if you want to transform your website into a PWA:
-
The website must be deployed with the HTTPS protocol. If you don’t have much experience with deployment, I can recommend an easy solution with Netlify.
-
The service worker must be present. It’s a script that your browser runs in the background, separate from a web page, opening the door to features that don’t need a web page or user interaction.
-
The Manifest file must be configured. It’s a simple JSON file that tells the browser about your web application and how it should behave when “installed” on the user’s mobile device or desktop.
How to turn your website into an app (using PWA's)
I’ll demonstrate an implementation of a PWA in a simple React application, which you can clone from the GitHub repo.
Firstly, as I mentioned earlier, our app must be deployed. I’ll not go through every step of deployment since this is not the main subject of this story. You can follow the tutorial on how to deploy a React app to Netlify.
After deployment, you should have your own URL to the website, which has HTTPS automatically configured.
The Service Worker
Now, we need to activate the service worker to configure the PWA. If you’re using Create React App, you have this script already implemented in serviceWorker.js.
You can go through the whole file to explore what’s going on here. It basically includes a few functions. For example, the function register() initiates the service worker in a user’s browser, if a website is visited for the first time.
In our app, you can enable registering the service worker in the root folder in index.js:
import React from "react";
import ReactDOM from "react-dom";
import "./index.css";
import App from "./App";
import * as serviceWorker from "./serviceWorker";

ReactDOM.render(<App />, document.getElementById("root"));

serviceWorker.register();
You just need to change line 9 from serviceWorker.unregister() to serviceWorker.register(). If you deploy this app once again, you can check if the service worker is working by checking it in the DevTools of your web browser.
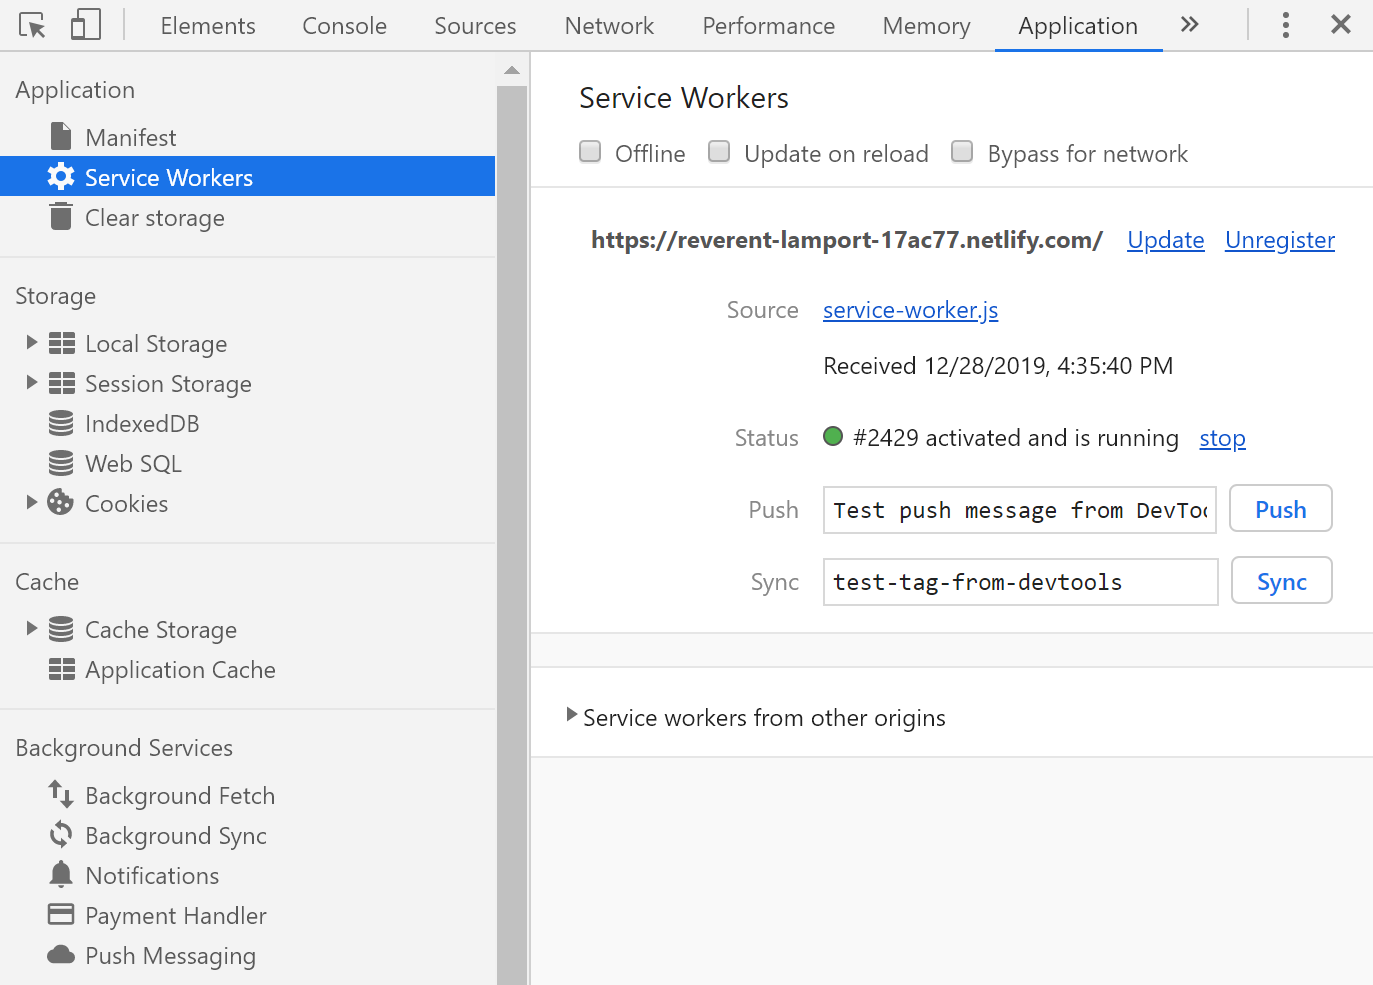
In Chrome, open DevTools and click on the tab Application -> Service Workers:

You should see your service worker in the status activated and running.
Now your files are stored in the memory cache of your browser, which causes faster loading times when a user visits the website again. This also means your app will work in offline mode with some limitations, of course.
Updating the PWA
In terms of updating your web app, the default setup is that the service worker is comparing the installed version with the newest version. If they are not equal, the new version is installed.
However, the user will recognize the changes when they launch or refresh the web app once again.
We’ve done two-thirds of the successful transformation to PWA. To complete it, we still need to create/update the Manifest file and appropriate app design.
The Manifest
As mentioned earlier, this is only a configuration file in JSON format, which influences how the web app should behave in a web browser. Having a manifest is required by browsers to show the *Add to Home Screen *prompt.
If your app is based on Create React App, this file is already implemented in the public folder, otherwise, you have to create a new one. You can check a basic example of what the Manifest file looks like.
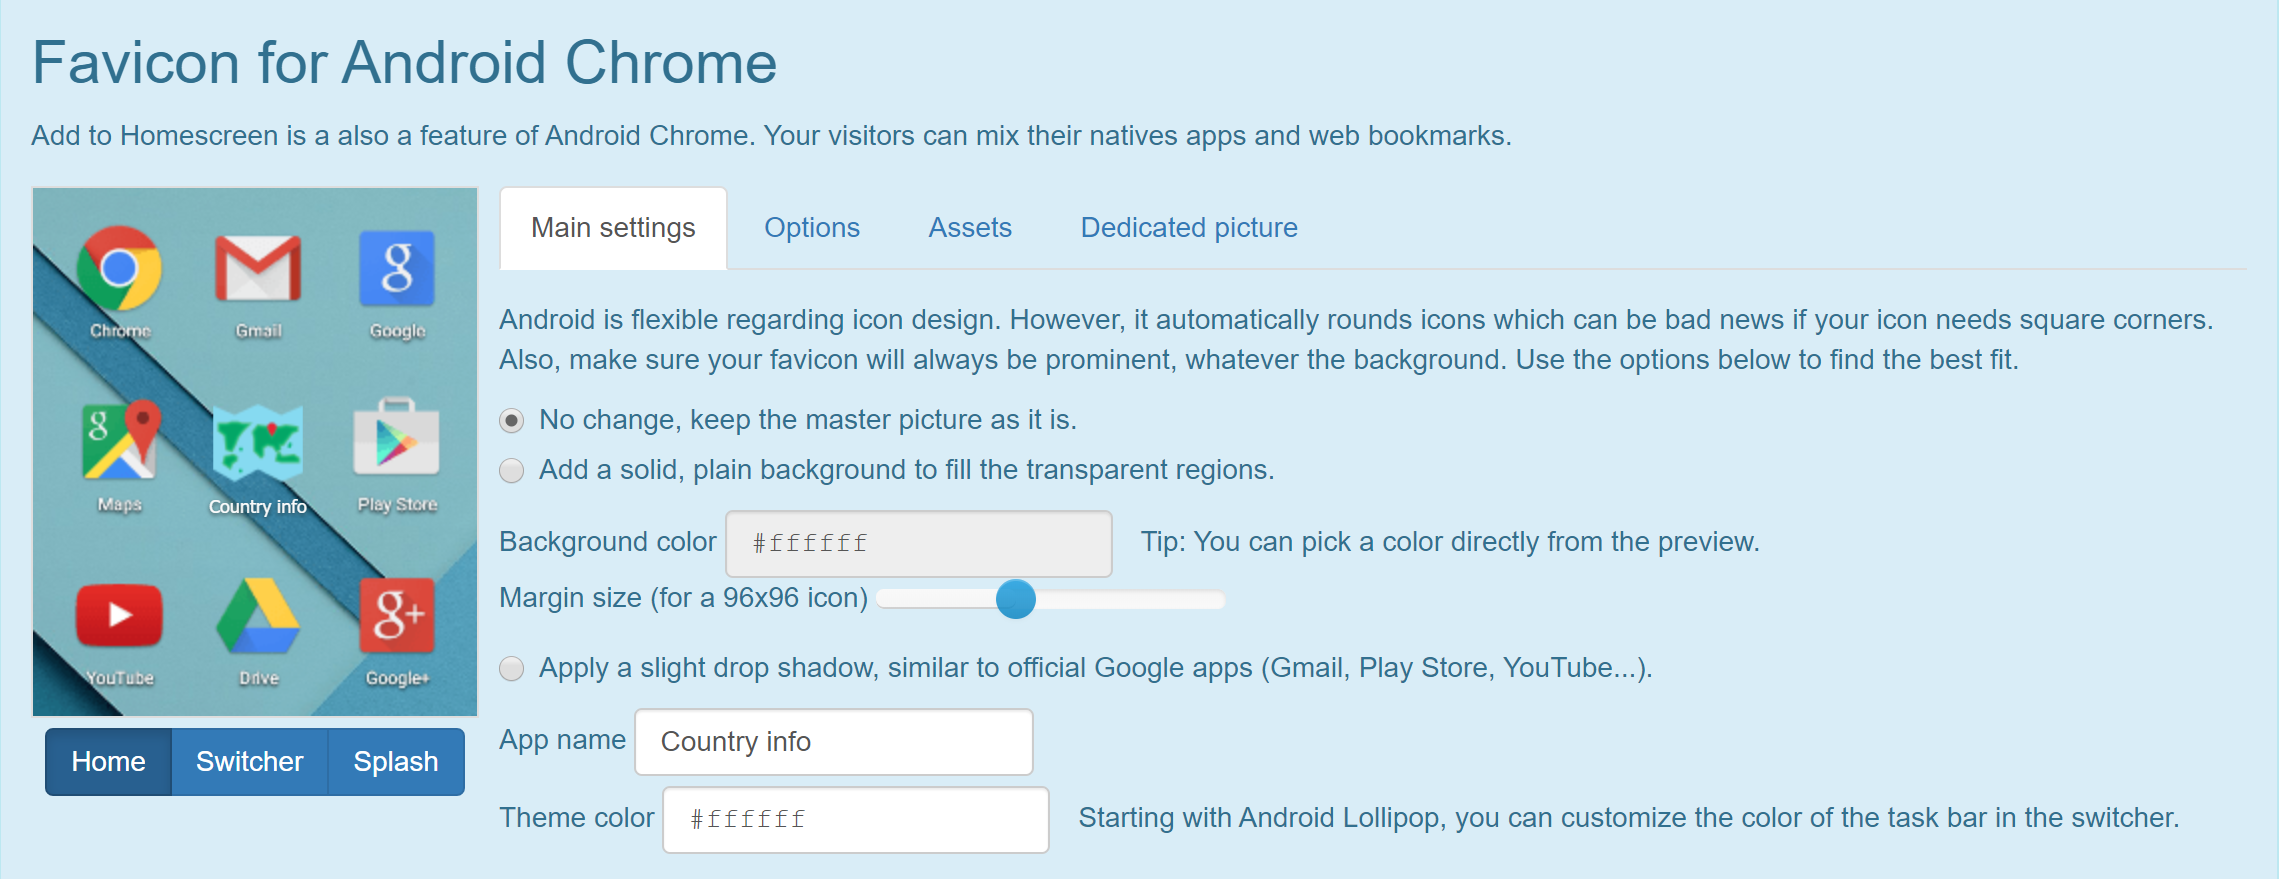
However, we need to update the file to provide full compatibility with web browsers. I’ll use the tool RealFaviconGenerator, where we can set up everything we need:
-
Favicons for various screen resolutions.
-
Theme design.
-
Splash screen.
Generating favicons
Firstly, you should pick an appropriate favicon for your web app. A favicon is a shortcut, website, or tab icon associated with your web app. You can try Flaticon for choosing the right one.
After picking a proper icon, you can upload it to RealFaviconGenerator and start to set things up.
Note: I recommend downloading the SVG file to preserve decent quality on any screen size.

As you can see, with this tool you’re able to change how the favicon and color theme will look like on a particular OS. There are a lot of options so you can play around with it and decide on the most appropriate setup.
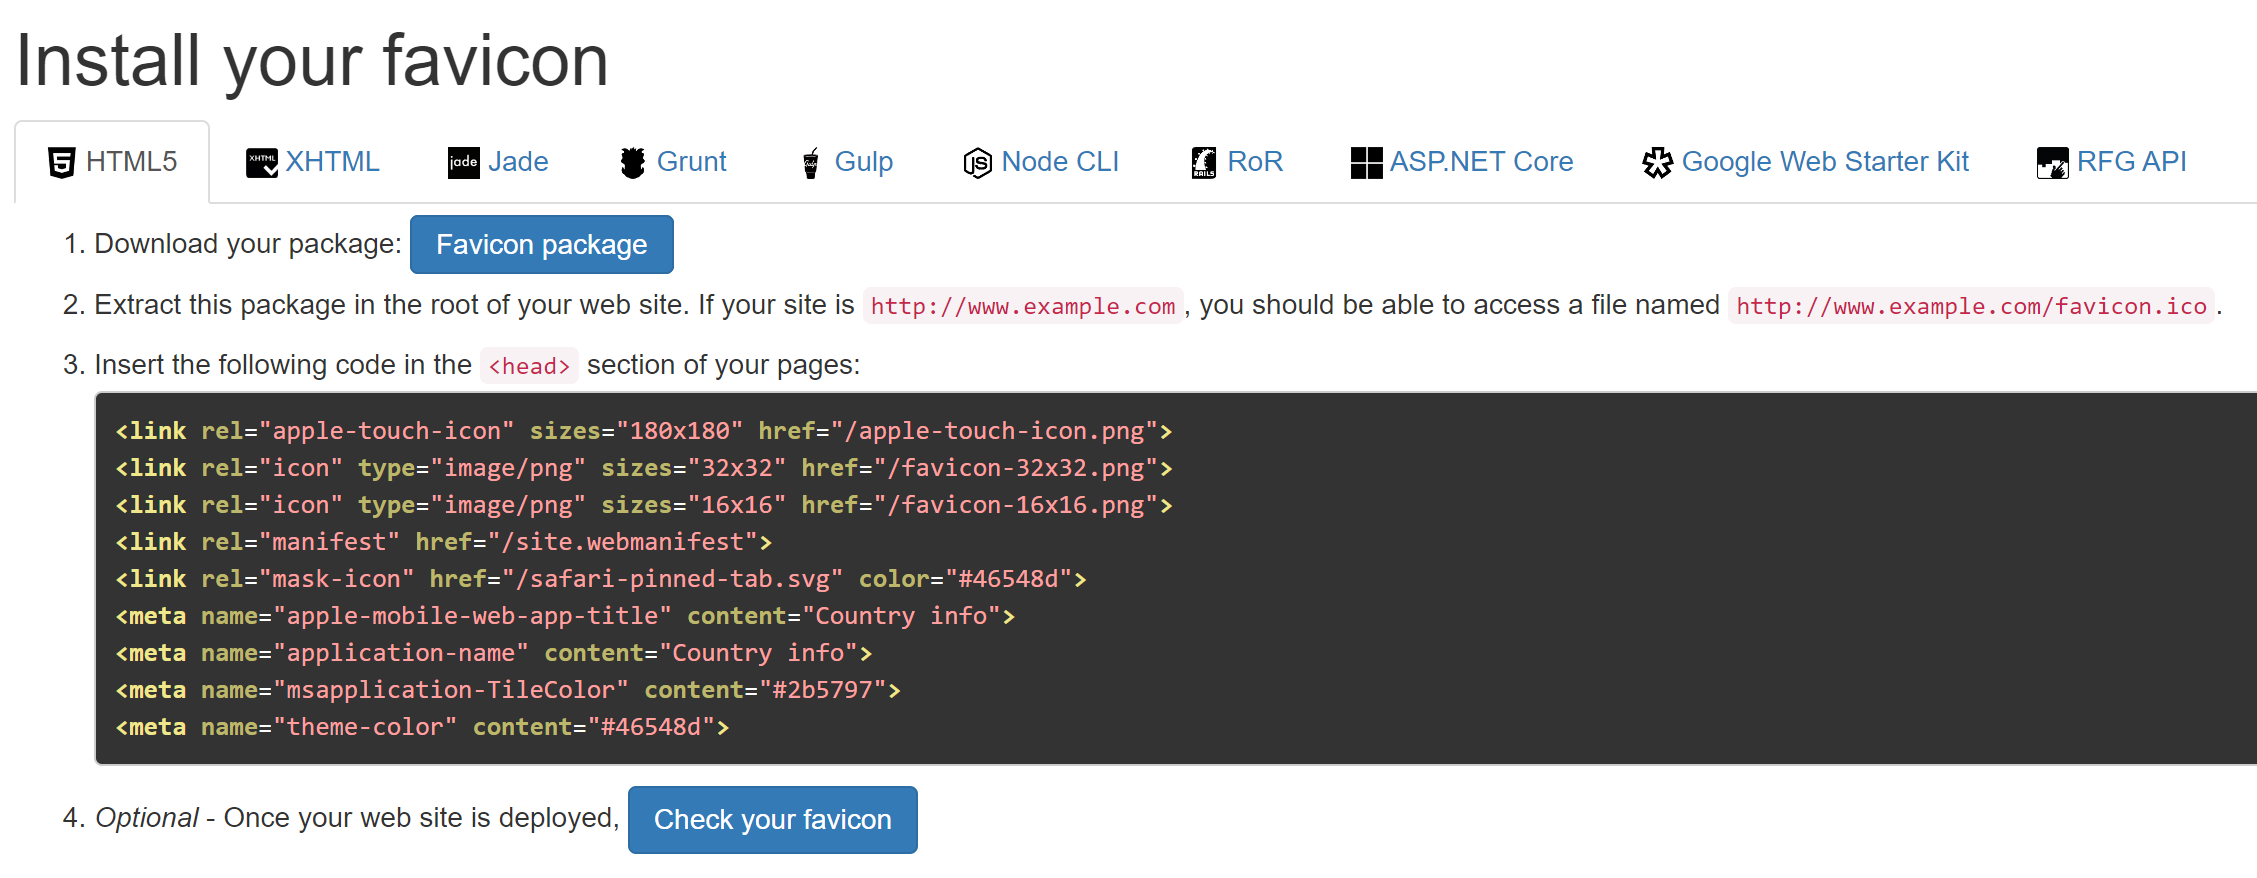
If you’re satisfied with your setup, you can proceed to generate favicons. It will offer you the following screen:

Just follow the instructions and your favicons will be set up for your project.
You can check out an example of the whole setup in the GitHub repo.
Testing your website PWA creation
After installing favicons in your project, you only need to deploy the web app again and you finally have the PWA!
You can test the app by viewing it on a smartphone. You should notice a prompt about installing the app on your device. On a PC, you should have a button with the + symbol in your address bar in the right corner.
Thank you for reading!
By the way, you can learn all about Progressive Web Apps and learn to code just like Miroslav by taking the ZTM courses which are available here.


