How To Use Schema Markup For SEO To Get More Traffic


Contents
Everyone wants more traffic to their website, but what if I told you there’s a single technique that you can use right now to dramatically improve your traffic, clicks, and impressions, almost overnight?
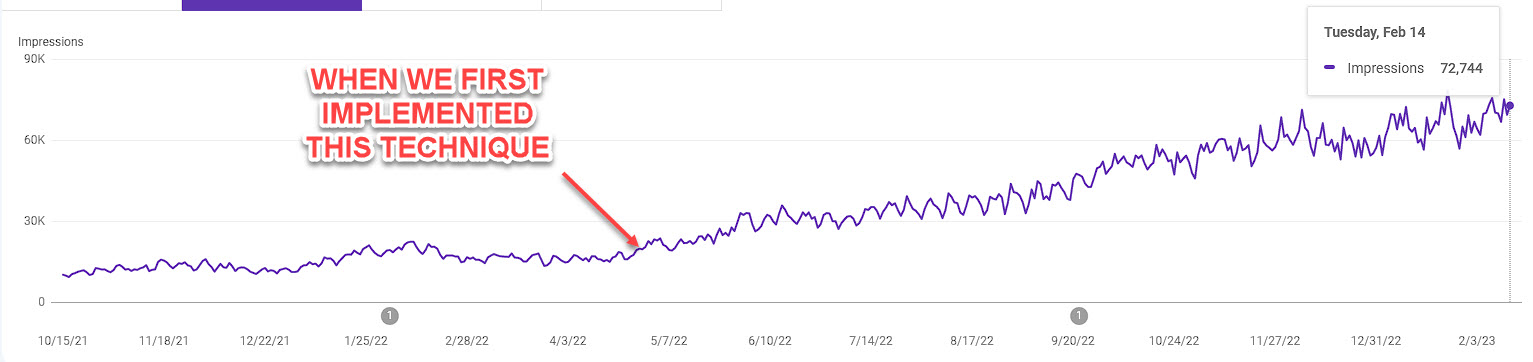
In fact, it’s the exact same technique that ZTM used to scale up to 2 Million monthly impressions in the SERPS in under 9 months, increasing their traffic by 188%...
And the best part is that hardly anyone is using this method. And of the ones that are, most of them still aren't doing it correctly, so this is a goldmine of opportunity.
No joke, if you’ve not been adding Schema Markup to your own site, then you need to stop what you’re doing right now and get this done ASAP.
Heck, even if you have been doing it, I recommend you jump to the last step in this guide because I have a tip to help you improve your CTR and appearance that most people miss.
Sound good?
Alright so let’s break it down, step by step…
What is Schema Markup?
Before I show you how to add this, here’s some clarity on why Schema is important, how it works, and 3 ways it will affect your results.
Benefit #1. Schema helps search engines recommend you more
Search engines want to give the best content to their users because the money they make is directly tied to the user experience. The more users a search engine has making more searches, the larger the audience it has to sell to advertisers.
This means they need to make sure that when someone searches, they not only get the right results for what the user is searching for (i.e. the intent), but it also needs to be high quality. If those users don’t find what they want, they may go elsewhere.
As marketers, we can help search engines understand what our content is about so that it gets recommended for the right searches using a technique called on-page SEO.
This is basically optimizing a post or any page on your site to help say to Google (and other search engines)...
“Hey Google, this article is about this topic. Give it to the people who search for X”.
And now that the search engine understands your post, it can recommend it when people search. Simple.
Schema markup is basically the next stage of on-page SEO, and was created as a collaboration between the 4 of the largest search engines:
- Bing
- Yahoo, and
- Yandex
It’s pretty rare that a bunch of competitors get together and work on a project so when they do, it’s worth paying attention.

The idea was this. Even with good on-page SEO, search engines can still get confused over the context behind a page and how it relates to a search query.

And so these big 4 created a series of ‘structured data archetypes’ that you can use to help add more information.
These are:
- Article
- Breadcrumb
- Event
- FAQ page
- How-to
- Job posting
- Local business
- Organization
- Person
- Product
- Recipe
- Video, and
- Website sitelinks search box
Each of these 'helps to add specific information to a page that signals context, or provides a unique result in the SERPS'.
What the heck does that mean?
In simple terms, it means you can further optimize your pages so search engines understand them better, and recommend that page to the right people, when they search.
Example for a food blogger:
"Hey Google, this page is a recipe. Here are the ingredients. Here are the instructions."
Not only will Google now know it's a recipe and will share it when people search, but it can also pull unique elements that a user might want for that search such as images, time to cook, and ingredients right there in the SERPs.

It's all designed to help further entice the user to click and check out the recipe
Important:
Don't worry if this all seems a little complex or freak out thinking that you need all of them, because you don't.
I've added links to the Google overview of each of these Schema types for if you want to learn more.
But if I'm honest? If you're here to learn how to use Schema for SEO and to get more traffic to pages and blog posts, then you'll only need the 2-3 that I'm going to show you how to use in this guide.
Simple!
The really cool thing about Schema, is that there are more benefits than just being understood better as a recommended result.
Benefit #2. Schema is used in multiple search result types
One of the really cool things about Schema markup is that it’s often used to pull information when new search result types are being created.
For example
Rich snippets are those teaser-type results that show up at the top of a page for certain search queries, with a link back to the original source.

So thanks to Schema, you have a chance to be shown at the top of the page, even above competitors that could be outranking you!
Already on the front page? Well now you show up more than once, increasing you overall traffic and chance to be clicked.
It's not just rich snippets either. Schema is used to pull information for multiple search result types like questions, images, how-to results, etc, meaning that you can show up even more.
It gets better though...
Benefit #3. Schema can help improve CTR in SERPS
Because you can use this same schema markup to customize metadata information, you can directly affect how your results look when they appear in the SERPS, increasing the chance they get clicked.

How good does that look compared to just boring text!? This means more clicks and more traffic, but it gets better still.
How?
Well, I mentioned this before but Google really wants to provide the best experience to its users. This means they keep track of specific things that they think show a user is enjoying a search result, such as the number of clicks across to the result, along with time on page.
What does this mean for you?
Simply put, if a SERP result is getting more clicks, the search engines assume its of more value and show it higher up the page. Even if it hasn't increased in backlinks.
Boom! You not only get a higher CTR, but also the chance at moving up the rankings for more organic clicks, meaning yet more traffic! It’s a win:win situation.
By now, I'm sure you can see why I’m such a big fan of Schema markup.
- Schema helps search engines understand your content better, which means they recommend your pages more often
- It’s also used to in multiple search result types such as rich snippets, meaning you have the potential to have your page show up above your competitors (even if they outrank you otherwise)
- Thanks to this customization, you can often get a higher CTR
- And that increased CTR can also mean that you might get pushed higher up the results, meaning more traffic again
Not bad for just a single change to each page right? And as you get more backlinks, (either from following my courses to do it yourself, or from hiring an agency) the effects compound even more.
So enough hype, let’s show you how to do it.
How to implement Schema Markup on your website
Note: There are only 5 steps to do this and although it’s easy to do, it’s a little time intensive.
Stick with it though and make sure to do step #4 if you want that higher CTR.
Step #1. Grab a Schema markup tool
Schema is a little complex, in that we need to create JSON code to insert it onto our pages.

The good news is that there is a heap of tools out there to help us create it, including WordPress plugins.
A word of caution: A lot of the tools out there try and automate the Schema code that appears on your site, and just pull in random information from your page. This means you can get this done quicker, but the results are often very basic, miss features, and can’t customize the appearance.
Instead of using them, I recommend the Merkle Schema markup generator, which is not only customizable, but it’s completely free to use.

During this post, I'll be showing you how I fill out each part of this tool. i.e. what to write in what section.
If you find them hard to follow, and want to zoom in on any of the images of this Schema tool in this example, simply click on the image and it will open up in a new window at full size.
So now let’s make that code…
Step #2. Create the Schema markup code
As well as the Merkle Schema tool, you’re going to need to open up notepad, along with the page that you want to create the markup for.
The reason we use notepad is that most pages will actually need a combination of different types of Schema, and we need to save them all in one place before we upload them to our page.
For blog posts, I usually use:
- Article
- FAQ page, and
- How to (if the article has specific steps to follow)
Not every page will need all of these as only articles would need the article Schema, or recipes would need recipe Schema, etc.
But when a page does need more than one, an easy solution is to create the first Schema and copy it to notepad, then repeat for the next type, and so on, until they are all saved on the same notepad document.

This means we then have all the code in one place and can then test it works in the next step, before uploading.
Before we do that though, let's assume that you have a blog post that you want to add markup to, let's walk through how to fill out these 3 main Schema types.
For this walkthrough, I’ll be creating the Schema markup code for a recent article from our blog on why you should learn System Design.

Creating Article Schema
Open up Merkle. Then from the drop-down menu, select the article Schema option and a new page. It should look like this:
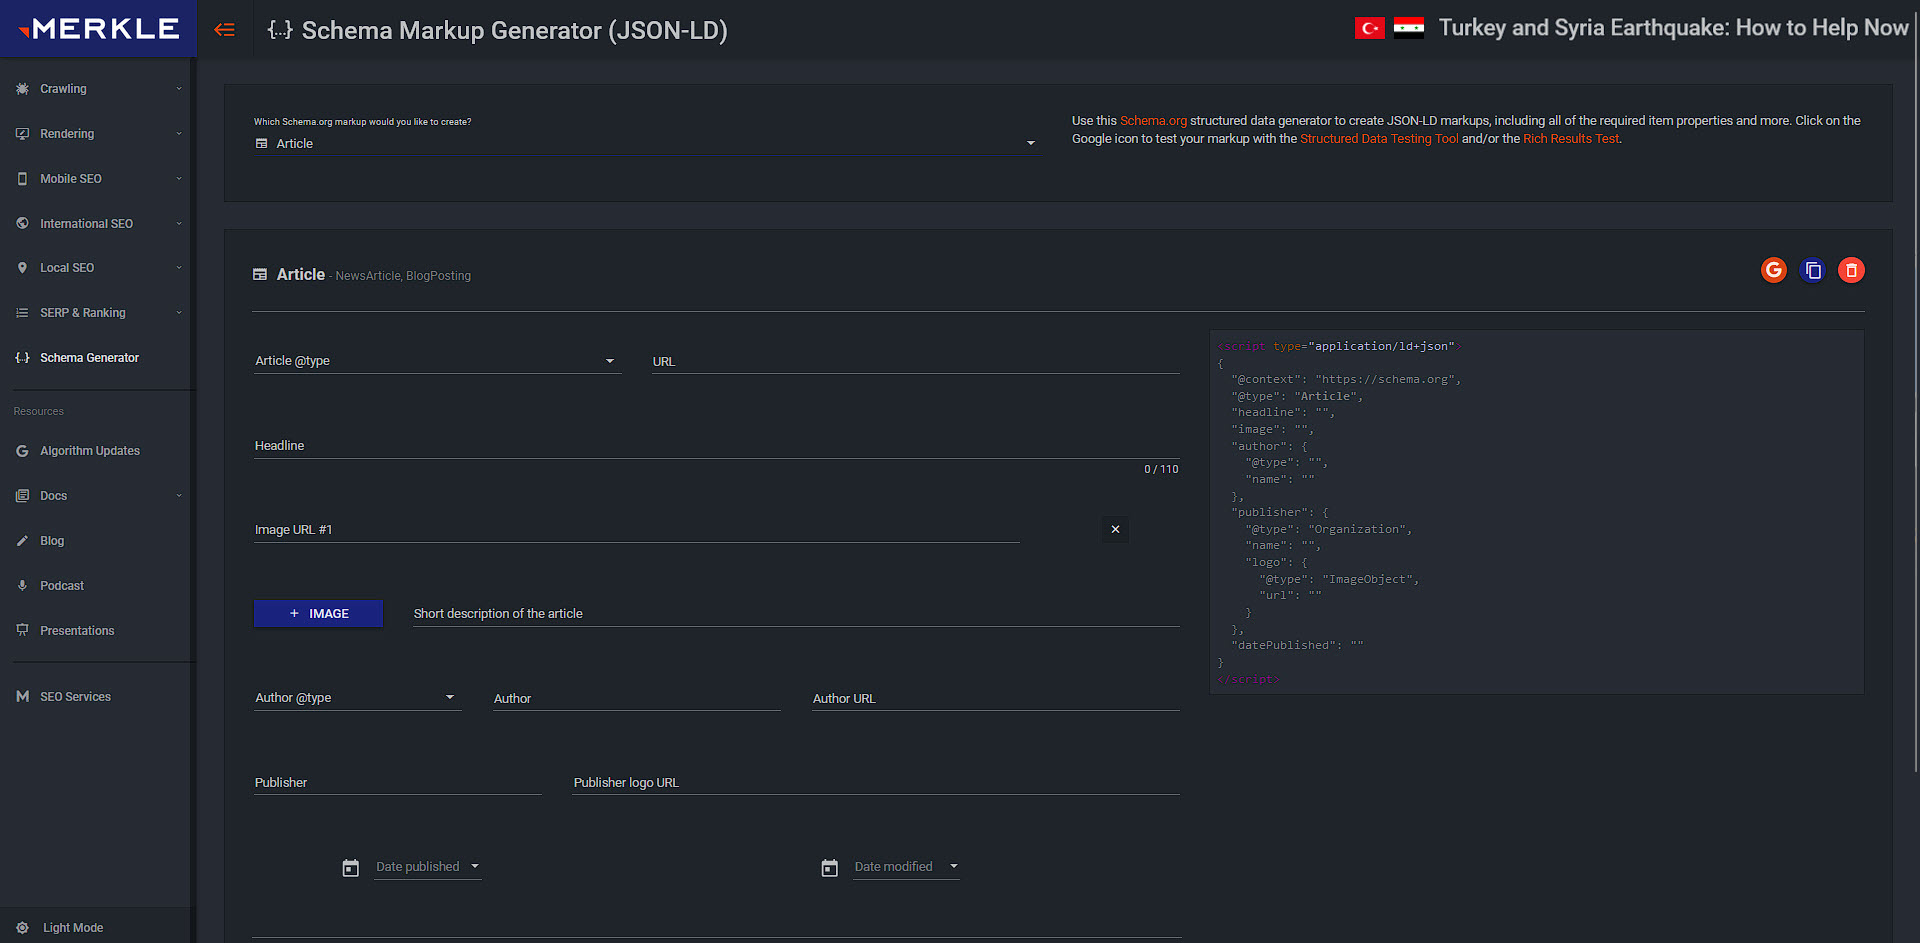
This type of Schema is nice and easy. You just need to fill out each section, like so:

Most of this information you can just copy across from the article itself, such as the headline, URL, and intro.
Once you’ve done that, copy the code on the right-hand side and save it to notepad.
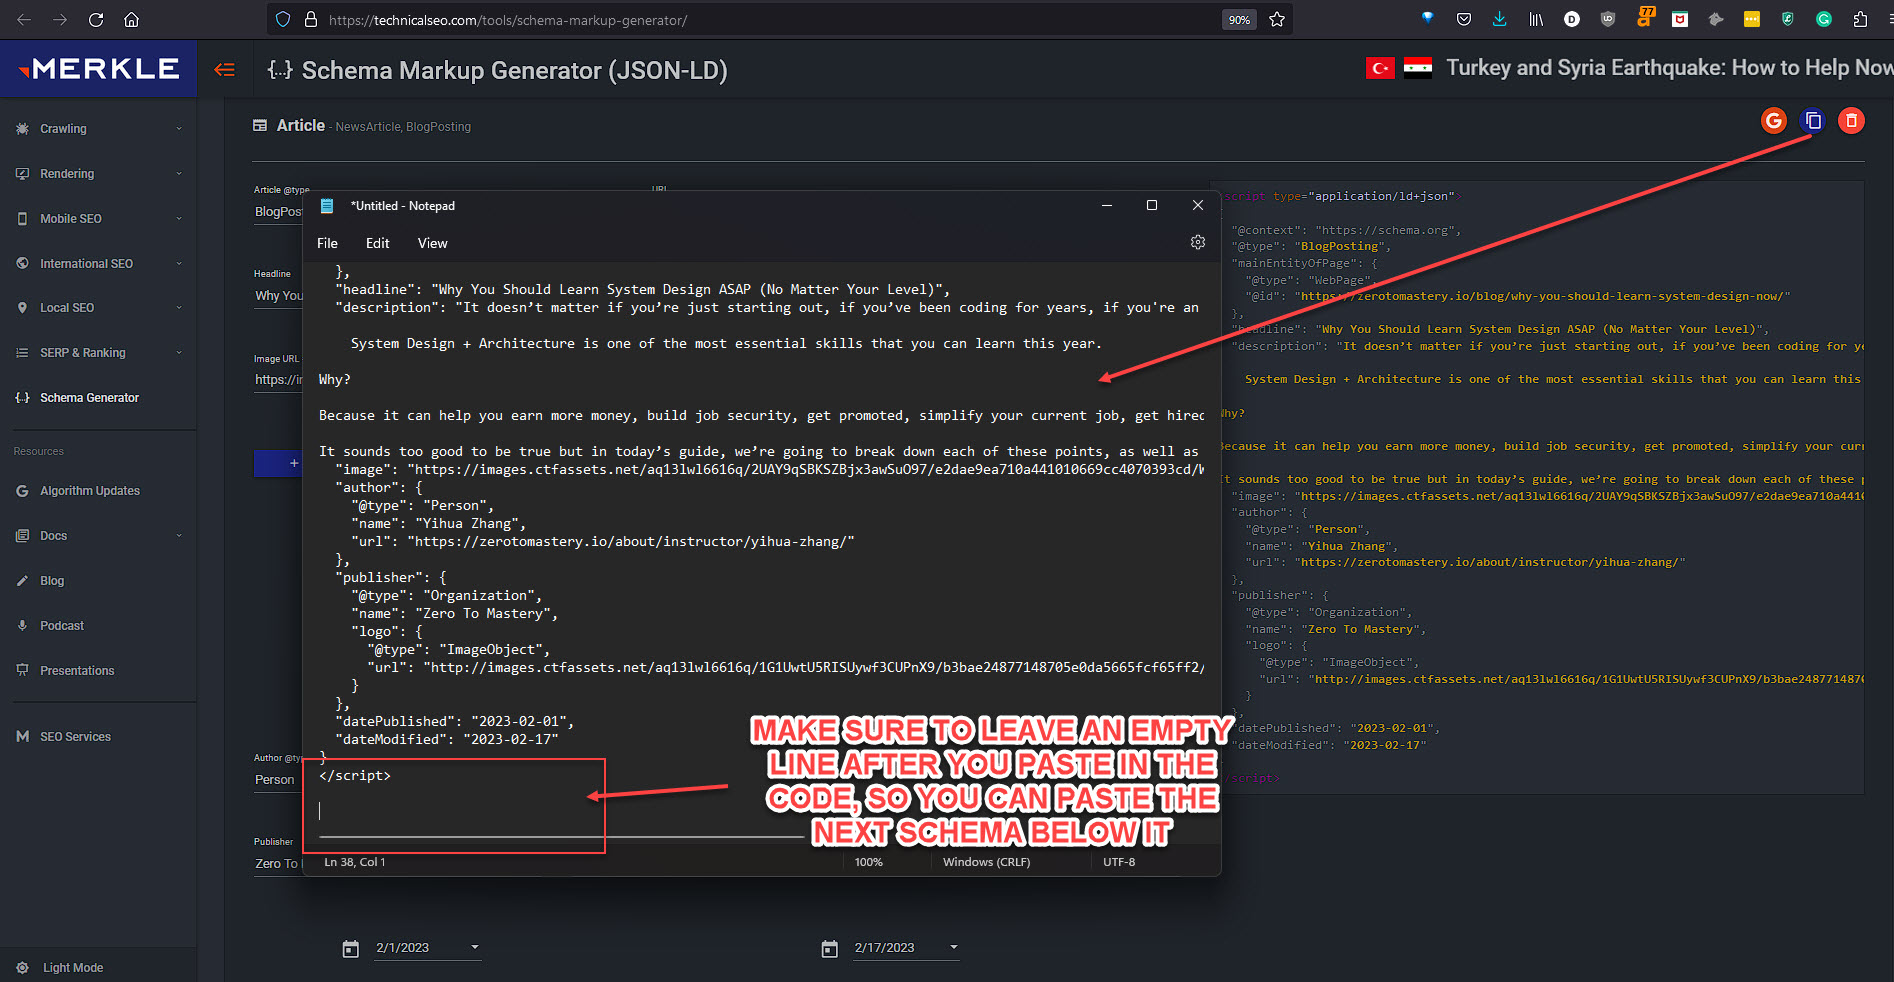
Important:
Make sure to add a line break below the code, so there’s a gap between this code you just pasted, and the next one. This way you won’t have an issue when you test it later.
Creating FAQ Schema
Now that you have the code saved in notepad, go ahead and click on the FAQ Schema in the drop-down menu.

All you have to do here is go through your page and look for questions people ask…

And then copy that information across into the Schema tool, one by one.
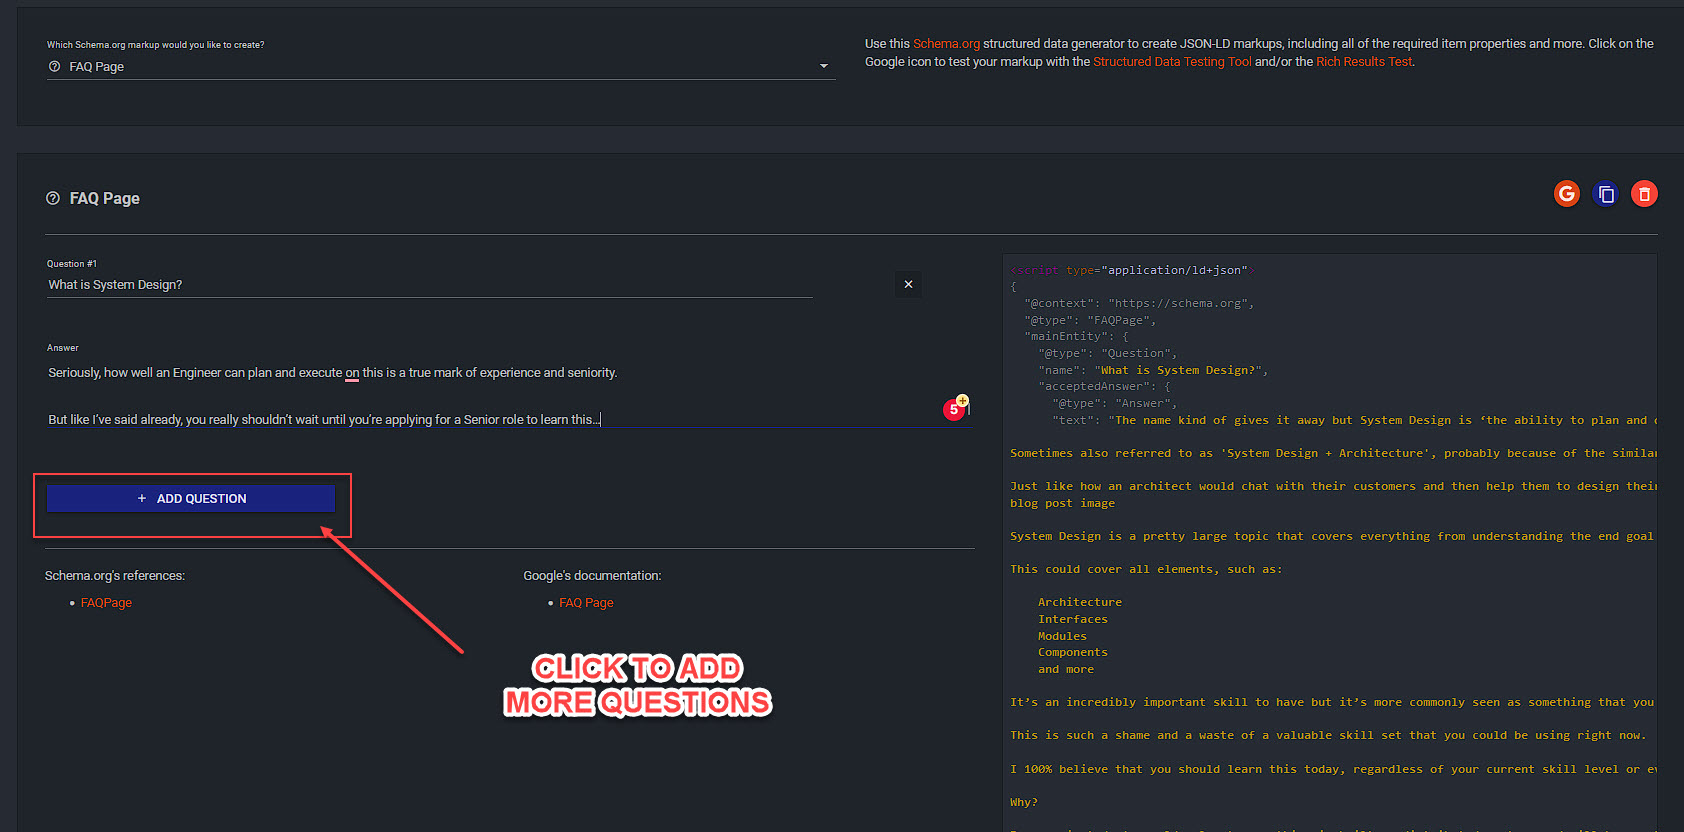
Rinse and repeat for each question on your page, and boom! Your page will now have a chance to show for FAQ rich snippets!
Sidenote:
Images are not brought across if you copy and paste them. Instead, they show up as ‘blog post image’ text.
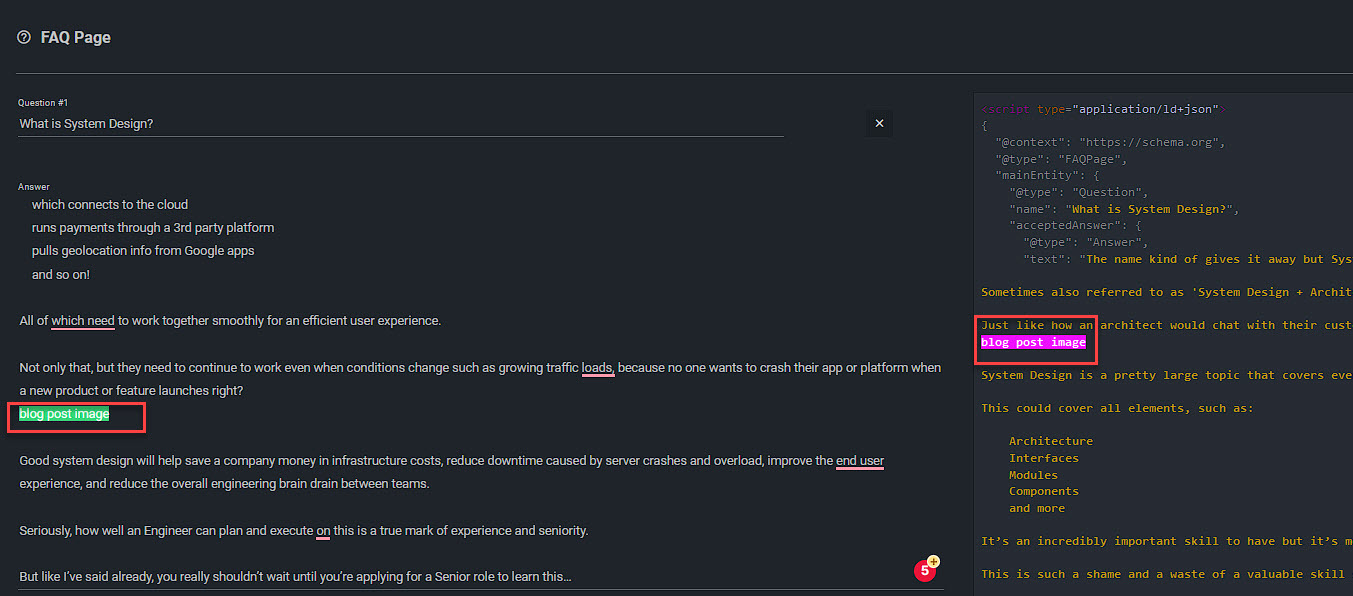
So either don’t copy them when you paste your FAQ info across, or go through and delete each of them. Otherwise, your result in the SERP will suddenly have the words "blog post image" randomly inside of sentences!
Once you’ve filled out each question from your page, copy and paste it into your notepad document below the previous schema code.

Now for the last one.
Creating How-to Schema
OK so this Schema takes a little more work and it’s slightly more complicated. The good news is that not every page needs it.
I like to use this code whenever I have specific steps or stages in a post, such as a sequence of information.
Go ahead and click on the drop down menu and select ‘how-to’.
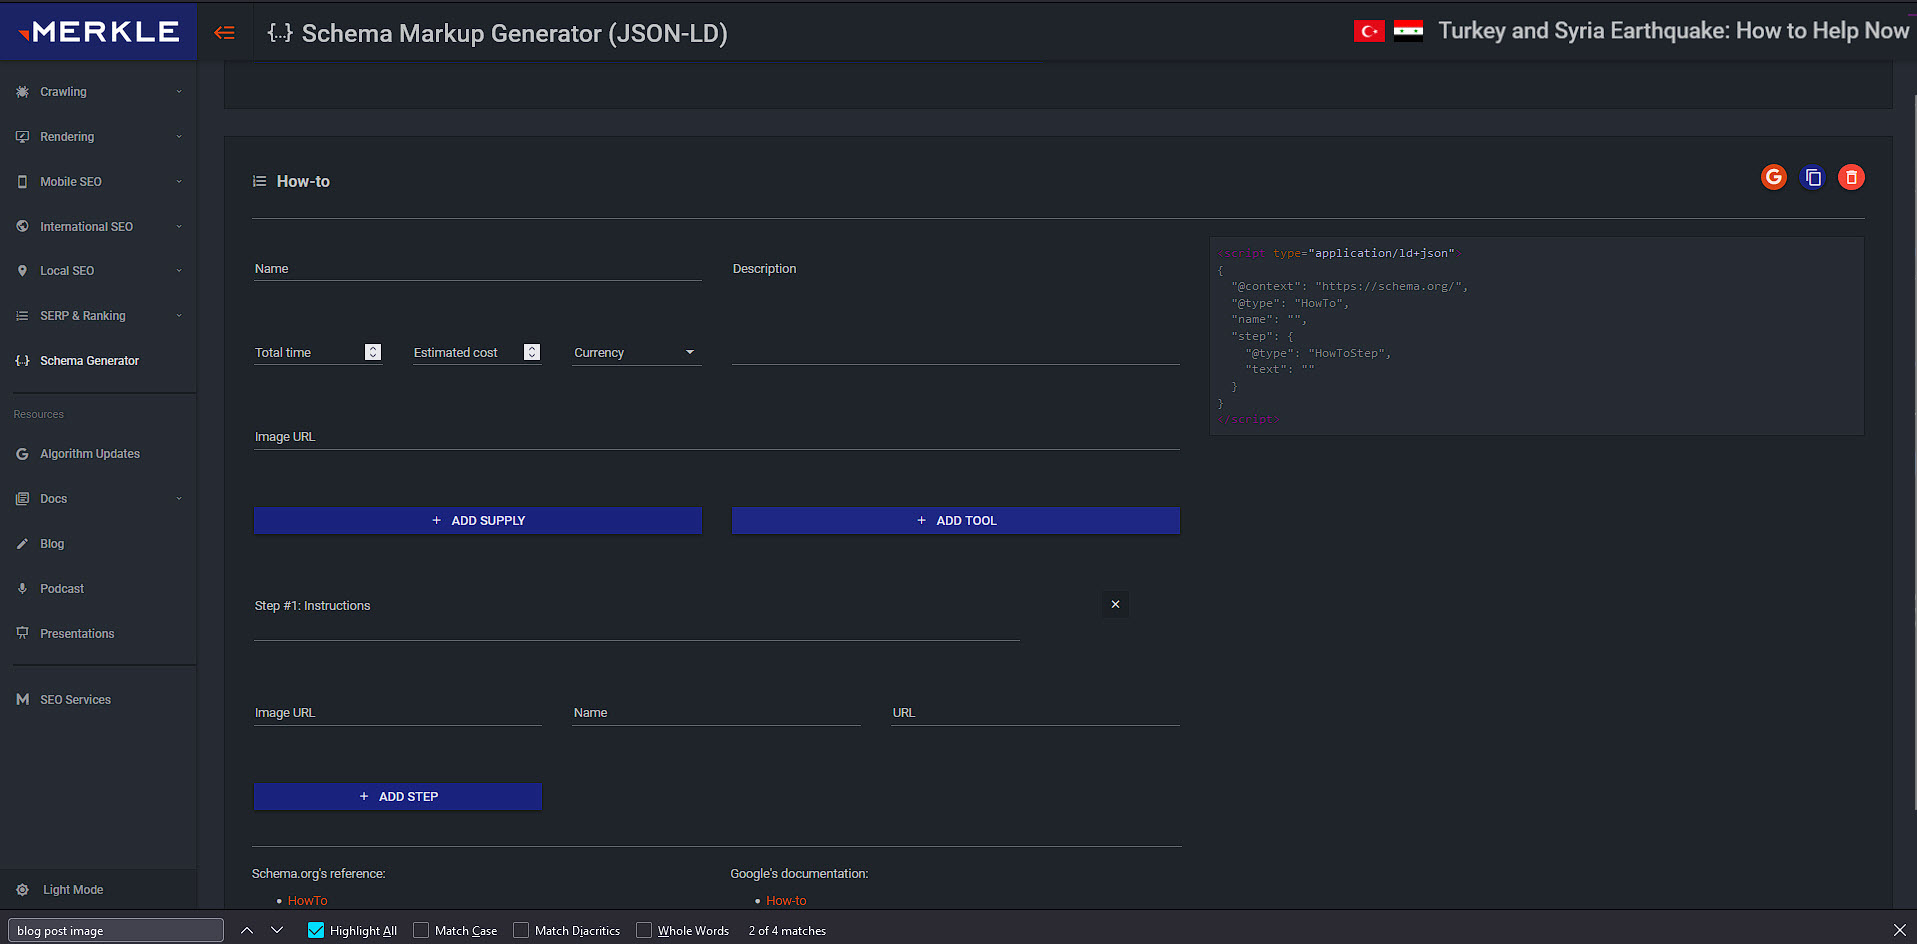
There are a few niggly things here and frustratingly, if they’re not filled out then it can cause errors when you upload. The key is to just make sure that every section has a value, so let’s walk through each part.
Core section:
- Name: Use the headline of your page or article
- Description: Use the introduction
- Total time: is annoyingly in seconds only. Try and estimate how long it will take to work through each step
- Estimated cost and currency: Add in any costs
- Image URL: Use the URL of your page's header image. Simply right-click and ‘copy image link’ to get the URL and then paste it in here
- Add supply and Add tool: Annoyingly, these 2 are not needed to be filled out and your code will still work, but if you don’t, you will get an alert in Google Search Console once your page has been recrawled. Fill out whatever you think is relevant.
Here’s an example from our article.
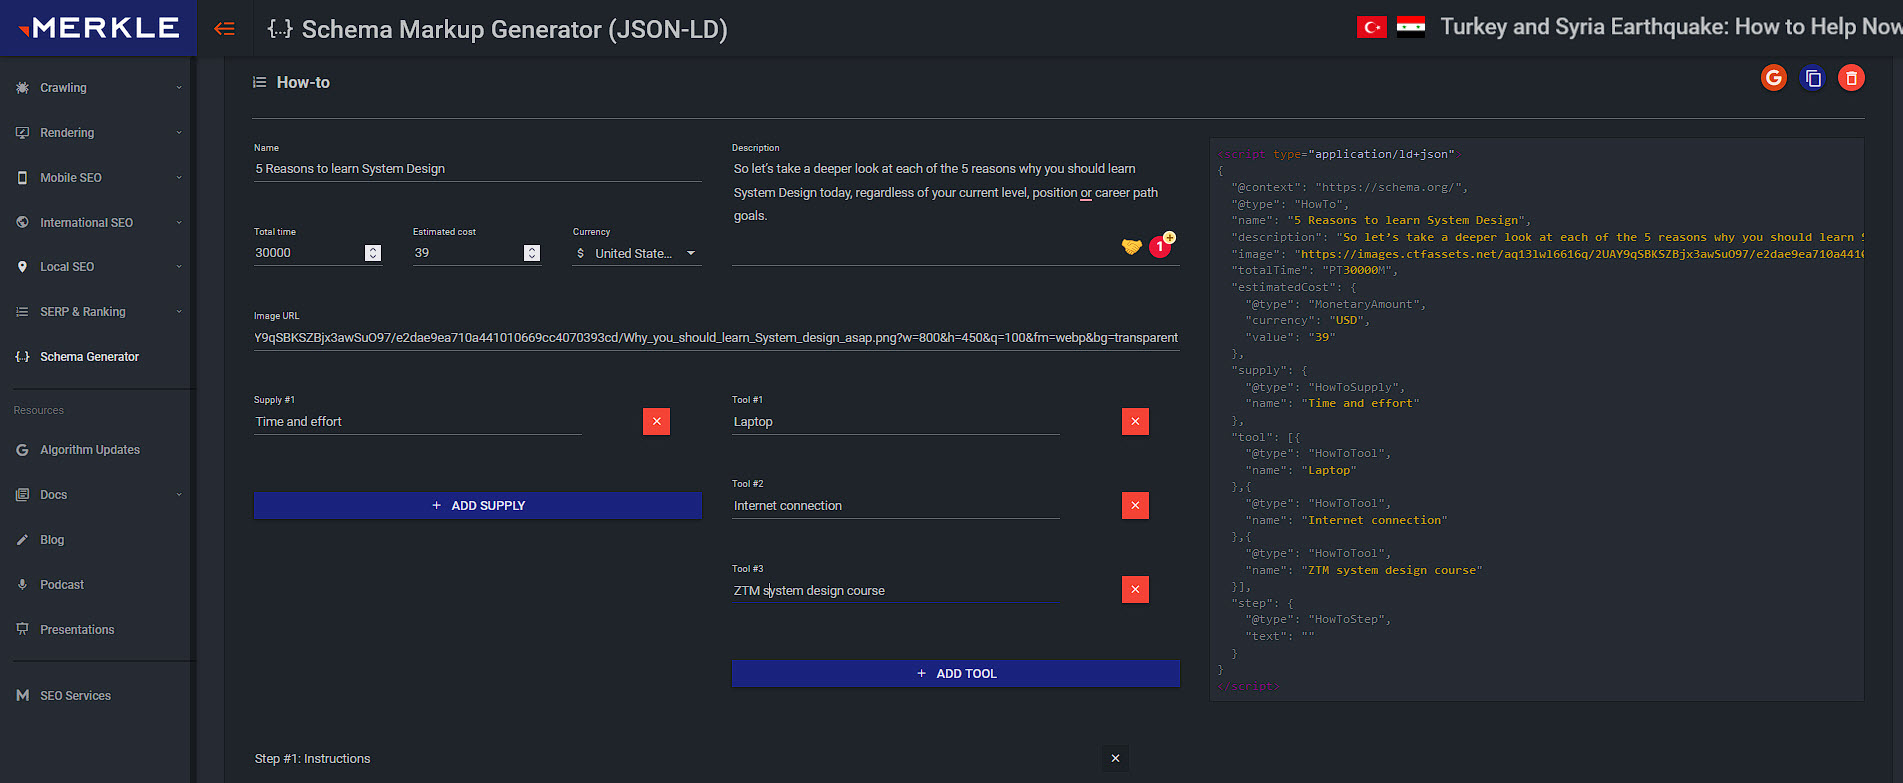
Once you’ve done all that, it’s time to fill out each step, so scroll down the page to fill it out.
Step section:
- Instructions: This is where you copy across all the information for this one step
- Image URL: If you have an image for the step that provides context, right-click and copy the image link here
- Name: This is the subhead of the step
- URL: This is the page URL and yes, unfortunately, you have to add it every time for each step
You’re going to do this for each step, so go back to your page and start working through the steps one by one, copying the information across.

As you start to fill it out, the tool will now look like this:
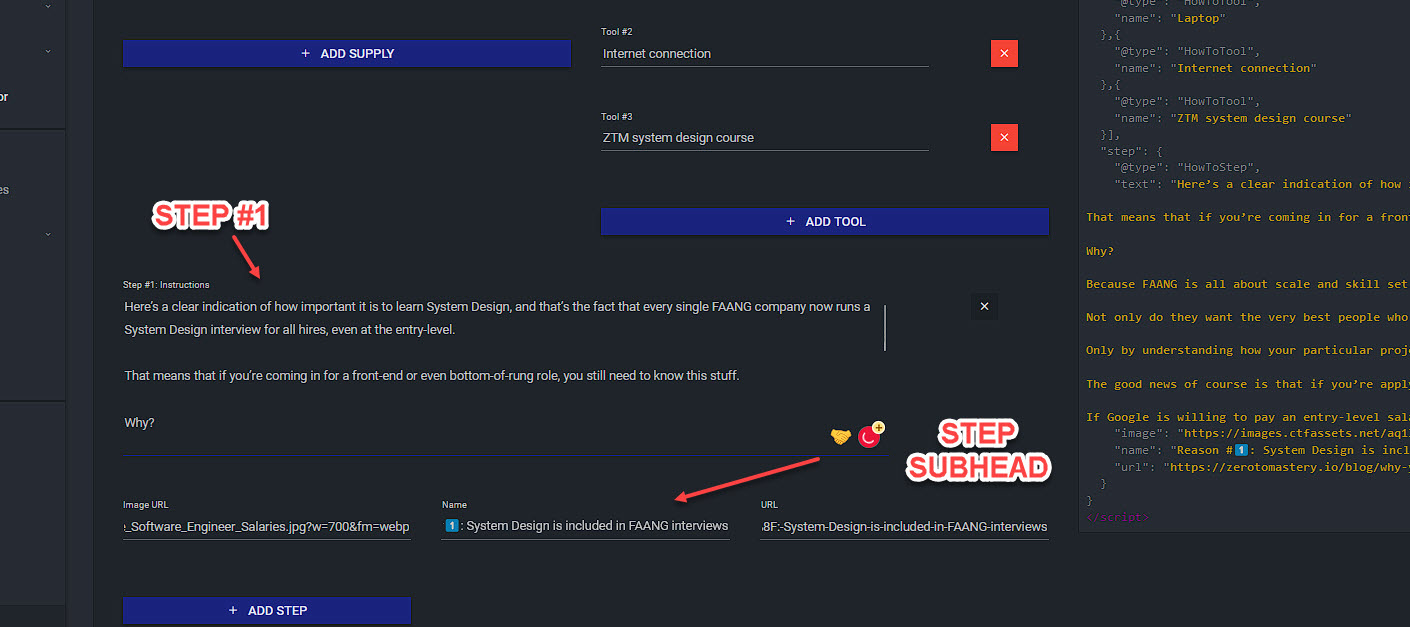
Easy right?
Now we just need to add each step, before copying and pasting the code into our notepad. Again, make sure to leave a gap between each type of Schema markup.
It's a bit tedious but totally worth it!
Now you have the entire code finished, it’s time to test it for any errors.
Step #3. Test the code for errors
There are 2 tools that we can use to check our code works:
Go ahead and open them both up.
Sidenote: You can technically get to these from inside the Merkle tool also in the top right corner of the screen.

The only issue is that it will upload the current code in the Schema markup tool, directly into the testing tools which is great, but it only copies the current code on the page.
This means that the previous 2 codes you created would not be included, so be sure to copy and paste the entire code from your notepad instead, and then run each tool.
Using the official Schema testing tool
Here’s what the schema testing tool will look like once we’ve run our code test:

You paste the code on the left-hand side, click the play button to run the test, and then the results appear on the right-hand side of the screen.
Important:
Notice how it shows the 3 types of Schema, and that there are no errors or warnings. If we had not added the supply section in the how-to Schema, this would show as a warning here.
So now we know it works with the Schema tool, let's paste the working code into Google's testing tool and see how it fares, and also preview what it looks like.
Using Google's rich testing tool
Simply paste your Schema code into the box and run the test.

Then, a new page will load up with the results that look like this:

Everything seems to be working ok.
Here’s the thing that a lot of people miss though. Go ahead and click on the ‘preview results’ option to see how this Schema will look in the SERPs.

Chances are it will look like a wall of text like this:

Not great right and not very appealing to click on, so let’s go the extra mile and customize it.
Step #4. Improve your code appearance
I’ll be totally honest with you, this step is the biggest time factor in adding this, but it’s also the main difference between a result that doesn’t get clicked at all, and a result that gets far more clicks than your competitors.
I haven’t seen anyone talk about this and 90% of people are not doing it, but you can actually customize these results further by adding HTML code into your Schema, to add spacing (key!!!), bold, italics, and even emojis.
Don’t worry if you’ve never done this before. These are the main features that I use.
How to add styling to Schema
Schema formats like a wall of text, so you need to manually add text styling and new lines.
All you need to do is add these types of code below.
For adding spacing between lines, you want to wrap each paragraph with this code:
<p> Then the text here </p>

For adding bullet points, you want to add this code here:
<ul>
<li>Bullet point 1 text goes here </li>
<li>Bullet point 2 text goes here </li>
<li>Bullet point 3 text goes here </li>
</ul>
Then, for bold and italic text, you simply add one of these wrapped around the word you want to bold or make italic:
Bold text = <strong> your text here that you want to be bold </strong>
Italic text = <em> your text here for italics </em>

Note:
Clickable links and text highlighting does not work, but emojis do show up. You can use this site for stars etc: https://emojipedia.org/star/, and simply copy and paste them into the article schema.

Like I said, this is time intensive but it makes a huge difference to your appearance and CTR.
Take the time and make sure you don’t just appear as a wall of text!
Step #5. Add your new Schema code to your page
Now that you have the code working and looking great, you just need to install it.
Note:
If you’re not sure how to install, there are usually options to insert code in most modern WordPress plugins and Content Management Systems, like so:

Simply copy and paste it, then hit save. Then keep doing it to create custom Schema markup for every page on your site.
Or at the very least, start with your most important pages.
Get more traffic to your site with Schema markup today!
So what are you waiting for? Start adding Schema markup to your site ASAP.
Yes, it’s time intensive to do, but it’s such a huge factor in appearing for results and increasing clicks, all without needing to get new backlinks (much harder) or create new content (also more time consuming).
Honestly, you’ll be amazed at how much impact this can have... you just need to go get it done 💪.


More from Zero To Mastery


This is Part 3 of a 3 part series on how I taught myself programming, and ended up with multiple job offers in less than 6 months!
 Andrei Neagoie

Step-by-step guide of how I’d learn to code for free (& use AI) in 2025. In 2014, I taught myself how to code and got hired using only free resources so I made this guide to help others do the same. Now 1,000s of people have joined me. You could be next.
Andrei Neagoie

Thinking of scaling your site traffic to new audiences and languages? In this guide, we walk you through the 4 major steps to get started with International SEO.
 Scott Stockdale