Terraform Cheat Sheet
We created this Terraform Cheat Sheet initially for students of our Terraform DevOps Bootcamp.
But we're now sharing it with any and all Developers that want to learn and remember some of the key functions and concepts of Terraform, and have a quick reference guide to the basics of Terraform.
Want to download a PDF version of this Terraform Cheat Sheet?
Enter your email below and we'll send it to you 👇
Unsubscribe anytime.
If you’ve stumbled across this cheatsheet and are just starting to learn about Terraform and cloud infrastructure, you've made a great choice!
If you want to get into cloud technologies, Terraform is where you should start. It's an open-source Infrastructure as Code (IaC) tool, meaning you can manage your cloud infrastructure using code or configuration files.
This has made it very popular and a great tool to learn if you're interested in becoming a DevOps Engineer.
However, if you're stuck in an endless cycle of YouTube tutorials and want to start provisioning real-world cloud infrastructure, become a professional developer, have fun and actually get hired, then come join the Zero To Mastery Academy.
By becoming a member of ZTM, you'll get access to Andrei's Terraform Bootcamp course where you'll learn Terraform from an actual industry professional (Andrei Dumitrescu) alongside 1,000s of other students in our private Discord community.
- You'll go from beginner to a top 10% DevOps Engineer or SysAdmin by learning advanced topics most courses don't cover
- You'll hands-on by building real cloud infrastructure from scratch
- You'll be able to provision infrastructure on AWS, secure it, and run EC2 instances and services on those instances
- By the end of the course you'll have gained the skills you need to become a certified Terraform Associate and get hired
One last thing... Andrei has also created a free step-by-step guide to becomeing a a DevOps Engineer that is worth checking out if you're considering a career in DevOps.
Just want the cheatsheet? No problem! Please enjoy and if you'd like to submit any suggestions, feel free to email us at support@zerotomastery.io
Contents
Terraform Architecture
Installation
Terraform CLI
Terraform Providers (Plugins)
Terraform Resources
Terraform Variables
Data Sources
Output Values
Loops
Conditional Expressions
Terraform Locals
Built-in Functions
Backends and Remote State
Terraform Modules
Troubleshooting and Logging
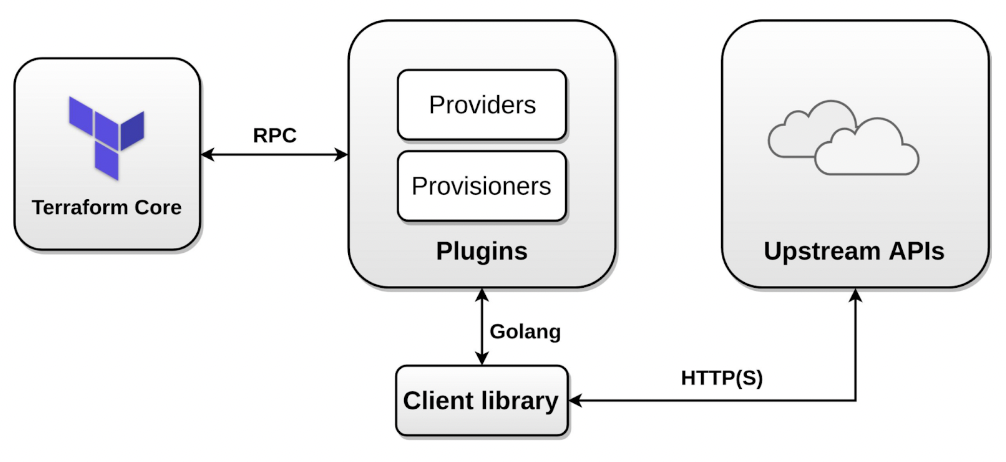
Terraform Architecture
Installation
Windows
-
Download the Windows binary for 32 or 64-bit CPUs from https://www.terraform.io/downloads.
-
Unzip the package.
-
Move the Terraform binary to the Windows PATH.
Linux (Ubuntu) Package Manager
- Run the following commands at the terminal.
curl -fsSL https://apt.releases.hashicorp.com/gpg | sudo apt-key add -
sudo apt-add-repository "deb [arch=amd64] https://apt.releases.hashicorp.com $(lsb_release -cs) main"
sudo apt-get update && sudo apt-get install terraform- Install Terraform using the package manager.
sudo apt update && sudo apt install terraform -y macOS Package Manager
Run the following commands at the terminal.
brew tap hashicorp/tap
brew install hashicorp/tap/terraform
Terraform CLI
terraform version
Displays the version of Terraform and all installed plugins.
terraform -install-autocomplete
Sets up tab auto-completion, requires logging back in.
terraform fmt
Rewrites all Terraform configuration files to a canonical format. Both configuration files (.tf) and variable files (.tfvars) are updated.
| Option | Description |
-check
|
Check if the input is formatted. It does not overwrite the file. |
-recursive
|
Also process files in subdirectories. By default, only the given directory (or current directory) is processed. |
terraform validate
Validates the configuration files for errors. It refers only to the configuration and not accessing any remote services such as remote state, or provider APIs.
terraform providers
Prints out a tree of modules in the referenced configuration annotated with their provider requirements.
terraform init
Initializes a new or existing Terraform working directory by creating initial files, loading any remote state, downloading modules, etc.
This is the first command that should be run for any new or existing Terraform configuration per machine. This sets up all the local data necessary to run Terraform that is typically not committed to version control.
This command is always safe to run multiple times.
| Option | Description |
-backend=false
|
Disable backend or Terraform Cloud initialization for this configuration and use what was previously initialized instead. |
-reconfigure
|
Reconfigure a backend, ignoring any saved configuration. |
-migrate-state
|
Reconfigure a backend and attempt to migrate any existing state. |
-upgrade
|
Install the latest module and provider versions allowed within configured constraints, overriding the default behavior of selecting exactly the version recorded in the dependency lockfile. |
terraform plan
Generates an execution plan, showing what actions will Terraform take to apply the current configuration. This command will not actually perform the planned actions.
| Option | Description |
-out=path
|
Write a plan file to the given path. This can be used as input to the "apply" command. |
-input=true
|
Ask for input for variables if not directly set. |
-var 'foo=bar'
|
Set a value for one of the input variables in the root module of the configuration. Use this option more than once to set more than one variable. |
-var-file=filename
|
Load variable values from the given file, in addition to the default files terraform.tfvars and *.auto.tfvars.
Use this option more than once to include more than one variable file. |
-destroy
|
Select the "destroy" planning mode, which creates a plan to destroy all objects currently managed by this Terraform configuration instead of the usual behavior. |
-refresh-only
|
Select the "refresh only" planning mode, which checks whether remote objects still match the outcome of the most recent Terraform apply but does not propose any actions to undo any changes made outside of Terraform. |
-target=resource
|
Limit the planning operation to only the given module, resource, or resource instance and all of its dependencies. You can use this option multiple times to include more than one object. This is for exceptional use only. |
terraform apply
Creates or updates infrastructure according to Terraform configuration files in the current directory.
| Option | Description |
-auto-approve
|
Skip interactive approval of plan before applying. |
-replace
|
Force replacement of a particular resource instance using its resource address. |
-var 'foo=bar'
|
Set a value for one of the input variables in the root module of the configuration. Use this option more than once to set more than one variable. |
-var-file=filename
|
Load variable values from the given file, in addition to the default files terraform.tfvars and *.auto.tfvars.
Use this option more than once to include more than one variable file. |
-parallelism=n
|
Limit the number of concurrent operations. Defaults to 10. |
Examples:
terraform apply -auto-approve -var-file=web-prod.tfvars
terraform apply -replace="aws_instance.server"
terraform destroy
Destroys Terraform-managed infrastructure and is an alias for terraform apply -destroy
| Option | Description |
-auto-approve
|
Skip interactive approval before destroying. |
-target
|
Limit the destroying operation to only the given resource and all of its dependencies. You can use this option multiple times to include more than one object. |
Example: terraform destroy -target aws_vpc.my_vpc -auto-approve
terraform taint
Describes a resource instance that may not be fully functional, either because its creation partially failed or because you've manually marked it as such using this command. Subsequent Terraform plans will include actions to destroy the remote object and create a new object to replace it.
terraform untaint
Removes that state from a resource instance, causing Terraform to see it as fully-functional and not in need of replacement.
terraform refresh
Updates the state file of your infrastructure with metadata that matches the physical resources they are tracking. This will not modify your infrastructure, but it can modify your state file to update metadata.
terraform workspace
| Option | Description |
delete
|
Delete a workspace. |
list
|
List workspaces. |
new
|
Create a new workspace. |
select
|
Select a workspace. |
show
|
Show the name of the current workspace. |
terraform state
This does advanced state management. The state is stored by default in a local file named "terraform.tfstate", but it can also be stored remotely, which works better in a team environment.
| Option | Description |
list
|
List resources in the state. |
show
|
Show a resource in the state. |
mv
|
Move an item in the state. |
rm
|
Remove instances from the state. |
pull
|
Pull current state and output to stdout. |
Examples:
terraform state show aws_instance.my_vm
terraform state pull > my_terraform.tfstate
terraform state mv aws_iam_role.my_ssm_role
terraform state list
terraform state rm aws_instance.my_server
terraform output
Reads an output variable from a Terraform state file and prints the value. With no additional arguments, output will display all the outputs for the root module.
Examples:
terraform output [-json]: Lists all outputs in the state file.terraform output instance_public_ip: Lists a specific output value.
terraform graph
Produces a representation of the dependency graph between different objects in the current configuration and state. The graph is presented in the DOT language. The typical program that can read this format is GraphViz, but many web services are also available to read this format.
Linux Example:
sudo apt install graphviz
terraform graph | dot -Tpng > graph.png
terraform import
Import existing infrastructure into your Terraform state. This will find and import the specified resource into your Terraform state, allowing existing infrastructure to come under Terraform management without having to be initially created by Terraform.
Example: terraform import aws_instance.new_server i-123abc
Imports EC2 instance with id i-abc123 into the Terraform resource named "new_server" of type "aws_instance".
terraform login [hostname]
Retrieves an authentication token for the given hostname, if it supports automatic login, and saves it in a credentials file in your home directory. If no hostname is provided, the default hostname is app.terraform.io, to log in to Terraform Cloud.
terraform logout [hostname]
Removes locally-stored credentials for the specified hostname. If no hostname is provided, the default hostname is app.terraform.io.
HCL Comment Styles
#
|
single-line comment. |
//
|
single-line comment (alternative to #). |
/* … */
|
multi-line comment (block comment). |
Terraform Providers (Plugins)
A provider is a Terraform plugin that allows users to manage an external API.
A provider usually provides resources to manage a cloud or infrastructure platform, such as AWS or Azure, or technology (for example Kubernetes).
There are providers for Infrastructure as a Service (IaaS), Platform as a Service (PaaS), and Software as a Service (SaaS).
Provider Configuration
terraform {
 required_providers {
   aws = {                      # provider local name
     source  = "hashicorp/aws"  # global and unique source address
     version = "~> 3.0"         # version constraint
   }
 }
}

# Configure the AWS Provider
provider "aws" {
 region = "us-central-1" # provider configuration options
}
Terraform Resources
Resources are the most important element in the Terraform language. It describes one or more infrastructure objects to manage.
Together the resource type and local name serve as an identifier for a given resource and must be unique within a module. Example: aws_vpc.main
Creating resources:
resource "<provider>_<resource_type>" "local_name"{
    argument1 = value
    argument2  = value
    …
}

# Example:
resource "aws_vpc" "main" {
    cidr_block = "10.0.0.0/16"
    enable_dns_support = true

    tags = {
        "Name" = "Main VPC"
    }
}
Terraform Variables
Input variables allow you customize aspects of Terraform without using hard-coded values in the source.
Declaring a variable
Variable declarations can appear anywhere in your configuration files. However, it's recommended to put them into a separate file called variables.tf.
# variable declaration
variable "vpc_cidr_block" {
   description = "CIDR block for VPC".
   default = "192.168.0.0/16"
   type = string
}
Assigning values to variables
-
Using the default argument in the variable declaration block.
-
Assign a value to the variable in the variable definition file which by default is terraform.tfvars. Example:
vpc_cidr_block = "172.16.0.0/16" -
Using -var command-line option. Example:
terraform apply -var="vpc_cidr_block=10.0.10.0/24" -
Using -var-file command-line option. Example:
terraform apply -auto-approve -var-file=web-prod.tfvars -
Exporting the variable at the terminal. Example:
export TF_VAR_vpc_cidr_block="192.168.100.0/24"
Variable definition precedence (from highest to lowest):
-
Variables specified at the terminal using** -var** and -var-file options.
-
Variables defined in terraform.tfvars.
-
Variables defined as environment variables using TF_VAR prefix.
String Interpolation
You can interpolate other values in strings by these values in ${}, such as ${var.foo}.
The interpolation syntax is powerful and allows you to reference variables, attributes of resources, call functions, etc.
You can escape interpolation with double dollar signs: $${foo} will be rendered as a literal ${foo}.
Variable Types
- Simple types a. number b. string c. bool d. null
- Complex types a. Collection types i. list ii. map iii. set b. Structural types i. tuple object
type number
variable "web_port" {
    description = "Web Port"
    default = 80
    type = number
}
type string
variable "aws_region" {
  description = "AWS Region"
  type = string
  default = "eu-central-1"
}
type bool
variable "enable_dns" {
  description = "DNS Support for the VPC"
  type = bool
  default = true
}
type list (of strings)
variable "azs" {
  description = "AZs in the Region"
  type = list(string)
  default = [
      "eu-central-1a",
      "eu-central-1b",
      "eu-central-1c"
      ]
}
type map
variable "amis" {
  type = map(string)
  default = {
    "eu-central-1" = "ami-0dcc0ebde7b2e00db",
    "us-west-1" = "ami-04a50faf2a2ec1901"
  }
}
type tuple
variable "my_instance" {
    type = tuple([string, number, bool])
    default = ["t2.micro", 1, true ]
}
type object
variable "egress_dsg" {
    type = object({
        from_port = number
        to_port = number
        protocol = string
        cidr_blocks = list(string)
    })
    default = {
     from_port = 0,
     to_port = 65365,
     protocol = "tcp",
     cidr_blocks = ["100.0.0.0/16", "200.0.0.0/16", "0.0.0.0/0"]
    }
}
Data Sources
Data sources in Terraform are used to get information about resources external to Terraform. For example, the public IP address of an EC2 instance. Data sources are provided by providers.
Use Data Sources
A data block requests that Terraform read from a given data source ("aws_ami") and export the result under the given local name ("ubuntu").
The data source and name together serve as an identifier for a given resource and therefore must be unique within a module.
Within the block body (between { and }) are query constraints defined by the data source.
data "aws_ami" "ubuntu" {
 most_recent = true

 owners = ["self"]
 tags = {
   Name   = "app-server"
   Tested = "true"
 }
}
Output Values
Output values print out information about your infrastructure at the terminal, and can expose information for other Terraform configurations (e.g. modules) to use.
Declare an Output Value
Each output value exported by a module must be declared using an output block. The label immediately after the output keyword is the name.
output "instance_ip_addr" {
 value = aws_instance.server.private_ip
}
Loops
Terraform offers the following looping constructs, each intended to be used in a slightly different scenario:
- count meta-argument: loop over resources.
- for_each meta-argument: loop over resources and inline blocks within a resource.
- for expressions: loop over lists and maps.
count
The count meta-argument is defined by the Terraform language and can be used to manage similar resources.
count is a looping technique and can be used with modules and with every resource type.
# creating multiple EC2 instances using count
resource "aws_instance" "server" {
  ami = "ami-06ec8443c2a35b0ba"
  instance_type = "t2.micro"
  count = 3  # creating 3 resources
}
In blocks where count is set, an additional count object is available.
count.index represents the distinct index number (starting with 0) corresponding to the current object.
for_each
for_each is another meta-argument used to duplicate resources that are similar but need to be configured differently.
for_each was introduced more recently to overcome the downsides of count.
If your resources are almost identical, count is appropriate. If some of their arguments need distinct values that can't be directly derived from an integer, it's safer to use for_each.
# declaring a variable
variable "users" {
  type = list(string)
  default = ["demo-user", "admin1", "john"]
}

# creating IAM users
resource "aws_iam_user" "test" {
  for_each = toset(var.users) # converts a list to a set
  name = each.key
}
For Expressions
A for expression creates a complex type value by transforming another complex type value.
variable "names" {
    type = list
    default = ["daniel", "ada'", "john wick"]
}

output "show_names" {
    # similar to Python's list comprehension
    value = [for n in var.names : upper(n)]
}

output "short_upper_names" {
  # filter the resulting list by specifying a condition:
  value = [for name in var.names : upper(name) if length(name) > 7]
}
If you run terraform apply -auto-approve you'll get:
Outputs:

short_upper_names = [
  "JOHN WICK",
]
show_names = [
  "DANIEL",
  "ADA'",
  "JOHN WICK",
]
Splat Expressions
A splat expression provides a more concise way to express a common operation that could otherwise be performed with a for expression.
# Launch an EC2 instance
resource "aws_instance" "server" {
  ami = "ami-05cafdf7c9f772ad2"
  instance_type = "t2.micro"
  count = 3
}

output "private_addresses"{
  value = aws_instance.server[*].private_ip  # splat expression
}
Dynamic Blocks
Dynamic blocks act much like a for expression, but produce nested blocks instead of a complex typed value. They iterate over a given complex value, and generate a nested block for each element of that complex value.
They are supported inside resource, data, provider, and provisioner blocks.
A dynamic block produces nested blocks instead of a complex typed value. It iterates over a given complex value, and generates a nested block for each element of that complex value.
# Declaring a variable of type list
variable "ingress_ports" {
  description = "List Of Ingress Ports"
  type = list(number)
  default = [22, 80, 110, 143]
}

resource "aws_default_security_group" "default_sec_group" {
  vpc_id = aws_vpc.main.id

 # Creating the ingress rules using dynamic blocks
 dynamic "ingress"{  # it produces ingress nested blocks
    for_each = var.ingress_ports # iterating over the list variable
    iterator = iport
    content {
        from_port = iport.value
        to_port = iport.value
        protocol = "tcp"
        cidr_blocks = ["0.0.0.0/0"]
     }
   }
}
Conditional Expressions
A conditional expression uses the value of a boolean expression to select one of two values.
Syntax: condition ? true_val : false_val
If condition is true then the result is true_val. If condition is false then the result is false_val.
The condition can be any expression that resolves to a boolean value. This will usually be an expression that uses the equality, comparison, or logical operators.
variable "istest" {
    type = bool
    default = true
}

# Creating the test-server instance if `istest` equals true
resource "aws_instance" "test-server" {
  ami = "ami-05cafdf7c9f772ad2"
  instance_type = "t2.micro"
  count = var.istest == true ? 1:0  # conditional expression
}

# Creating the prod-server instance if `istest` equals false
resource "aws_instance" "prod-server" {
  ami = "ami-05cafdf7c9f772ad2"
  instance_type = "t2.large"   # it's not free tier eligible
  count = var.istest == false ? 1:0  # conditional expression
}
Terraform Locals
Terraform local values or simply locals are named values that you can refer to in your configuration.
Compared to variables, Terraform locals do not change values during or between Terraform runs and unlike input variables, locals are not submitted by users but calculated inside the configuration.
Locals are available only in the current module. They are locally scoped.
# the local values are declared in a single `locals` block
locals {
  owner = "DevOps Corp Team"
  project = "Online Store"
  cidr_blocks = ["172.16.10.0/24", "172.16.20.0/24", "172.16.30.0/24"]
  common-tags = {
      Name = "dev"
      Environment = "development"
      Version = 1.10
  }
}

# Create a VPC.
resource "aws_vpc" "dev_vpc" {
  cidr_block = "172.16.0.0/16"
  tags = local.common-tags
}

# Create a subnet in the VPC
resource "aws_subnet" "dev_subnets" {
  vpc_id            = aws_vpc.dev_vpc.id
  cidr_block        = local.cidr_blocks[0]
  availability_zone = "eu-central-1a"

  tags = local.common-tags
}

# Create an Internet Gateway Resource
resource "aws_internet_gateway" "dev_igw" {
  vpc_id = aws_vpc.dev_vpc.id
  tags = {
    "Name" = "${local.common-tags["Name"]}-igw"
    "Version" = "${local.common-tags["Version"]}"
  }
}
Note: Local values are created by a locals block (plural), but you reference them as attributes on an object named local (singular).
Built-in Functions
Terraform includes a number of built-in functions that can be called from within expressions to transform and combine values.
Examples of functions: min, max, file, concat, element, index, lookup.
Terraform does not support user-defined functions.
There are functions for numbers, strings, collections, file system, date and time, IP Network, Type Conversions and more.
You can experiment with the behavior of Terraform's built-in functions from the Terraform console, by running the terraform console command.
Examples:
> max(5, 12, 9)
12

> min(12, 54, 3)
3

> format("There are %d lights", 4)
There are 4 lights

> join(", ", ["foo", "bar", "baz"])
foo, bar, baz

> split(",", "foo,bar,baz")
[
 "foo",
 "bar",
 "baz",
]

> replace("hello world", "/w.*d/", "everybody")
hello everybody

> substr("hello world", 1, 4)
ello

> element(["a", "b", "c"], 1)
b

> lookup({a="ay", b="bee"}, "a", "what?")
ay
> lookup({a="ay", b="bee"}, "c", "what?")
what?

> slice(["a", "b", "c", "d"], 1, 3)
[
 "b",
 "c",
]

> timestamp()
"2022-04-02T05:52:48Z"

> formatdate("DD MMM YYYY hh:mm ZZZ", "2022-01-02T23:12:01Z")
02 Jan 2022 23:12 UTC

> cidrhost("10.1.2.240/28", 1)
10.1.2.241

> cidrhost("10.1.2.240/28", 14)
10.1.2.254
Backends and Remote State
Backends
Each Terraform configuration has an associated backend that defines how operations are executed and where the Terraform state is stored.
The default backend is local, and it stores the state as a plain file in the current working directory.
The backend needs to be initialized by running terraform init.
If you switch the backend, Terraform provides a migration option which is terraform init -migrate-state.
Terraform supports both local and remote backends:
- local (default) backend stores state in a local JSON file on disk.
- remote backends stores state remotely. Examples of remote backends are AzureRM, Consul, GCS, Amazon S3, and Terraform Cloud. They can support features like remote operation, state locking, encryption, and versioning.
Configure Remote State on Amazon S3
-
On the AWS console go to Amazon S3 and create a bucket.
-
Configure Terraform to use the remote state from within the S3 bucket.
terraform {
 backend "s3" {
   bucket = "bucket_name"
   key    = "s3-backend.tfstate"
   region = "eu-central-1"
   access_key = "AKIA56LJEQNM"
   secret_key = "0V9cw4CVON2w1"
 }
}- Run
terraform initto initialize the backend.
Configure Remote State on Terraform Cloud
-
The first step is to sign up for a free Terraform Cloud account.
-
Create your organization or join a new one.
-
Configure Terraform to use the remote state from within the S3 bucket.
terraform {
  required_providers {
    aws = {
      source  = "hashicorp/aws"
      version = "~> 3.0"
    }
  }
  cloud {
    organization = "master-terraform"  # should already exist on Terraform cloud
    workspaces {
      name = "DevOps-Production"
    }
  }
}-
Authenticate to Terraform Cloud to proceed with initialization.
-
Run 'terraform login'.
-
Run 'terraform init' to initialize the backend.
Terraform Modules
Terraform modules are a powerful way to reuse code and stick to the DRY principle, which stands for "Do Not Repeat Yourself". Think of modules as functions in a programming language.
Modules will help you organize configuration, encapsulate configuration, re-use configuration and provide consistency and ensure best-practices.
Terraform supports Local and Remote modules:
- Local modules are stored locally, in a separate directory, outside of the root environment and have the source path prefixed with ./ or ../
- Remote modules are stored externally in a separate repository, and support versioning. External Terraform modules are found on the Terraform Registry.
A Terraform module is a set of Terraform configuration files in a single directory.
When you run Terraform commands like terraform plan or terraform apply directly from such a directory, then that directory will be considered the root module.
The modules that are imported from other directories into the root module are called child modules.
Calling a child module from within the root module:
module "myec2" {
  # path to the module's directory
  # the source argument is mandatory for all modules.
  source = "../modules/ec2"

  # module inputs
  ami_id = var.ami_id
  instance_type = var.instance_type
  servers = var.servers
}
It's good practice to start building everything as a module, create a library of modules to share with your team and from the very beginning to start thinking of your entire infrastructure as a collection of reusable modules.
After adding or removing a module, you must re-run terraform init to install the module.
Troubleshooting and Logging
The TF_LOG enables logging and can be set to one of the following log levels: TRACE, DEBUG, INFO, WARN or ERROR.
Once you have configured your logging you can save the output to a file. This is useful for further inspection.
The TF_LOG_PATH variable will create the specified file and append the logs generated by Terraform.
Example:
export TF_LOG_PATH=terraform.log
terraform apply
You can generate logs from the core application and the Terraform provider separately.
To enable core logging, set the TF_LOG_CORE environment variable, and to generate provider logs set the TF_LOG_PROVIDER to the appropriate log level.