PyTorch Cheat Sheet
We created this PyTorch Cheat Sheet initially for students of our PyTorch for Deep Learning Bootcamp. But we're now sharing it with any and all Machine Learning Engineers and Developers that want to learn and remember some of the key functions and concepts of PyTorch, and have a quick reference guide to the basics of PyTorch.
Want to download a PDF version of this PyTorch Cheat Sheet?
Enter your email below and we'll send it to you 👇
Unsubscribe anytime.
If you’ve stumbled across this cheatsheet and are just starting to learn PyTorch, you've made a great choice!
PyTorch is a machine learning and deep learning framework written in Python that enables you to craft new and use existing state-of-the-art deep learning algorithms like neural networks powering much of today’s Artificial Intelligence (AI) applications.
This has made it very popular with companies that use machine learning and is great to learn if you're interested in becoming a Machine Learning Engineer or Deep Learning Engineer.
However, if you're stuck in an endless cycle of YouTube tutorials and want to start building real world projects, become a professional developer, have fun and actually get hired, then come join the Zero To Mastery Academy.
You'll learn PyTorch from an actual industry professional alongside thousands of students in our private Discord community.
You'll not only learn to become a top 10% Machine Learning Engineer by learning advanced topics most courses don't cover. But you'll also build complex real-world projects that will make you and your portfolio stand out to potential employers!
Just want the cheatsheet? No problem! Please enjoy and if you'd like to submit any suggestions, feel free to email us at support@zerotomastery.io
Contents
Imports
Creating Tensors
Domain Libraries
Device-Agnostic Code (using PyTorch on CPU, GPU or MPS)
Setting Random Seeds
Neural Networks
- Linear Layers
- Convolutional Layers
- Transformer Layers
- Recurrent Layers
- Activation Functions
- Loss Functions
- Optimizers
End-to-end Example Workflow
Extras
Imports
You can install PyTorch on various platforms via the PyTorch installation page.
import torch

# Check the version
print(f"PyTorch version: {torch.__version__}")
You can also import the common abbreviation "nn" for "Neural Networks”.
from torch import nn

# Almost everything in PyTorch is called a "Module" (you build neural networks by stacking together Modules)
this_is_a_module = nn.Linear(in_features=1,
                             out_features=1)
print(type(this_is_a_module))
Data imports
Since most of machine learning is finding patterns in data, it's good to know how to work with datasets in PyTorch.
# Import PyTorch Dataset (you can store your data here) and DataLoader (you can load your data here)
from torch.utils.data import Dataset, DataLoader
Creating Tensors
One of the main use cases of PyTorch is for accelerated deep learning computing.
And deep learning usually involves the manipulation of large tensors (big, multi-dimensional collections of numbers).
PyTorch has a number of methods to create tensors.
Note: For a more extensive overview of creating tensors with PyTorch, see 00. PyTorch Fundamentals.
# Create a single number tensor (scalar)
scalar = torch.tensor(7)

# Create a random tensor
random_tensor = torch.rand(size=(3, 4)) # this will create a tensor of size 3x4 but you can manipulate the shape how you want

# Multiply two random tensors
random_tensor_1 = torch.rand(size=(3, 4))
random_tensor_2 = torch.rand(size=(3, 4))
random_tensor_3 = random_tensor_1 * random_tensor_2 # PyTorch has support for most math operators in Python (+, *, -, /)
Domain Libraries
Depending on the specific problem you're working on, PyTorch has several domain libraries.
- TorchVision — PyTorch’s resident computer vision library.
- TorchText — PyTorch’s in-built domain library for text.
- TorchAudio — PyTorch’s domain library for everything audio.
- TorchRec — PyTorch’s newest in-built domain library for powering recommendation engines with deep learning.
Computer Vision
Note: For an in-depth overview of computer vision in PyTorch, see 03. PyTorch Computer Vision.
# Base computer vision library
import torchvision

# Other components of TorchVision (premade datasets, pretrained models and image transforms)
from torchvision import datasets, models, transforms
Text and Natural Language Processing (NLP)
# Base text and natural language processing library
import torchtext

# Other components of TorchText (premade datasets, pretrained models and text transforms)
from torchtext import datasets, models, transforms
Audio and Speech
# Base audio and speech processing library
import torchaudio

# Other components of TorchAudio (premade datasets, pretrained models and text transforms)
from torchaudio import datasets, models, transforms
Recommendation systems
Note: This library is currently in beta release, see the GitHub page for installation.
# Base recommendation system library
import torchrec

# Other components of TorchRec
from torchrec import datasets, models
Device-agnostic code (using PyTorch on CPU, GPU or MPS)
Much of deep learning involves computing on tensors.
Computing on tensors generally happens much faster on GPUs (graphics processing units, typically from NVIDIA) than CPUs (computer processing units).
MPS stands for "Metal Performance Shader" which is Apple's GPU (M1, M1 Pro, M2 etc).
It is advised to perform training on the fastest piece of hardware you have available, which will generally be: NVIDIA GPU ("cuda") > MPS device ("mps") > CPU ("cpu").
- For more on seeing how to get PyTorch to run on NVIDIA GPU (with CUDA), see 00. PyTorch Fundamentals.
- For more on running PyTorch using an MPS backend (running PyTorch on Mac GPUs) see the PyTorch documentation.
Note: It is advised to setup device-agnostic code at the start of your workflow.
# Setup device-agnostic code
if torch.cuda.is_available():
    device = "cuda" # NVIDIA GPU
elif torch.backends.mps_is_available():
    device = "mps" # Apple GPU
else:
    device = "cpu"

print(f"Using device: {device}")
Sending a tensor to target device
You can move objects (models and tensors) in PyTorch to different devices via the .to("device_name") method.
# Create a tensor
x = torch.tensor([1, 2, 3])
print(x.device) # defaults to CPU

# Send tensor to target device
x = x.to(device)
print(x.device)
Setting random seeds
A lot of machine learning and deep learning involves taking random numbers in tensors and then shaping those random numbers to find/represent patterns in real data.
However, sometimes you'll want "reproducible" randomness.
To do so, you can set the random seeds, see Reproducibility (trying to take the random out of random) for more.
import torch

# Set the random seed (you can set this to any number you like, it will "flavour"
# the randomness with that number.
torch.manual_seed(42)

# Create two random tensors
random_tensor_A = torch.rand(3, 4)

torch.manual_seed(42) # set the seed again (try commenting this out and see what happens)
random_tensor_B = torch.rand(3, 4)

print(f"Tensor A:\n{random_tensor_A}\n")
print(f"Tensor B:\n{random_tensor_B}\n")
print(f"Does Tensor A equal Tensor B? (anywhere)")
random_tensor_A == random_tensor_B>>> Tensor A:
tensor([[0.8823, 0.9150, 0.3829, 0.9593],
[0.3904, 0.6009, 0.2566, 0.7936],
[0.9408, 0.1332, 0.9346, 0.5936]])
Tensor B:
tensor([[0.8823, 0.9150, 0.3829, 0.9593],
[0.3904, 0.6009, 0.2566, 0.7936],
[0.9408, 0.1332, 0.9346, 0.5936]])
Does Tensor A equal Tensor B? (anywhere)
tensor([[True, True, True, True],
[True, True, True, True],
[True, True, True, True]])You can also set the random seed on the GPU (CUDA devices).
# Set random seed on GPU
torch.cuda.manual_seed(42)
Neural Networks
PyTorch has a very comprehensive library of pre-built neural network components (many of these are referred to as "modules" in the PyTorch ecosystem).
At a fundamental level neural networks are stacks of layers. Each of these layers performs some kind of operation on an input and produces an output.
How these layers stack together will depend on the problem you're working on.
One of the most active areas of research in machine learning is how to stack neural network layers together (and the best answer to this is constantly changing).
The vast majority of neural network components in PyTorch are contained within the torch.nn package (nn is short for neural networks).
from torch import nnLinear layers
PyTorch has several in-built linear layers.
# Create a linear layer with 10 in features and out features
linear_layer = nn.Linear(in_features=10,
                         out_features=10)
# Create an Identity layer
identity_layer = nn.Identity()Convolutional Layers (for making Convolutional Neural Networks or CNN's)
PyTorch has several in-built convolutional layers.
Naming of convolutional layers usually follows torch.nn.ConvXd where X can be a value of 1, 2 or 3.
The X value represents the number of dimensions the convolution will operate over, for example, 1 for singular dimension text, 2 for two dimension images (height x width) and 3 for 3D objects such as video (video is considered a series of images with a time dimension, height x width x time).
Note: You can see more on building convolutional neural networks for computer vision with PyTorch in 03. PyTorch Computer Vision.
# Create a Conv1d layer (often used for text with a singular dimension)
conv1d = nn.Conv1d(in_channels=1,
                   out_channels=10,
                   kernel_size=3)
# Create a Conv2d layer (often used for images with Height x Width dimensions)
conv2d = nn.Conv2d(in_channels=3, # 3 channels for color images (red, green, blue)
out_channels=10,
kernel_size=3)# Create a Conv3d layer (often used for video with Height x Width x Time dimensions)
conv3d = nn.Conv3d(in_channels=3,
out_channels=10,
kernel_size=3)Transformer Layers (for making Transformer models)
PyTorch has in-built Transformer layers as described in the paper Attention Is All You Need.
Using in-built PyTorch Transformer layers has the benefit of potential speedups thanks to PyTorch's BetterTransformer.
Note: You can see the use of PyTorch's in-built Transformer layers to build a Vision Transformer in 08. PyTorch Paper Replicating.
# Create a Transformer model (model based on the paper "Attention Is All You Need" - https://arxiv.org/abs/1706.03762)
transformer_model = nn.Transformer()
# Create a single Transformer encoder cell
transformer_encoder = nn.TransformerEncoderLayer(d_model=768, # embedding dimension
nhead=12) # number of attention heads# Stack together Transformer encoder cells
transformer_encoder_stack = nn.TransformerEncoder(encoder_layer=transformer_encoder, # from above
num_layers=6) # 6 Transformer encoders stacked on top of each other# Create a single Transformer decoder cell
transformer_decoder = nn.TransformerDecoderLayer(d_model=768,
nhead=12)# Stack together Transformer decoder cells
transformer_decoder_stack = nn.TransformerDecoder(decoder_layer=transformer_decoder, # from above
num_layers=6) # 6 Transformer decoders stacked on top of each otherRecurrent Layers (for making Recurrent Neural Networks or RNN's)
PyTorch has in-built support for Recurrent Neural Network layers such as long short-term memory (LSTM) and gated recurrent unit (GRU).
# Create a single LSTM cell
lstm_cell = nn.LSTMCell(input_size=10, # can adjust as necessary
                        hidden_size=10) # can adjust as necessary
# Stack together LSTM cells
lstm_stack = nn.LSTM(input_size=10,
hidden_size=10,
num_layers=3) # 3 single LSTM cells stacked on top of each other# Create a single GRU cell
gru_cell = nn.GRUCell(input_size=10, # can adjust as necessary
hidden_size=10) # can adjust as necessary# Stack together GRU cells
gru_stack = nn.GRU(input_size=10,
hidden_size=10,
num_layers=3) # 3 single GRU cells stacked on top of each otherActivation Functions
Activation functions often go between layers in a neural network to add non-linear (non-straight) capabilities to linear (straight) functions.
In essence, a neural network is often comprised of a large amount of linear and non-linear functions.
PyTorch has several non-linear activation functions built into torch.nn.
Some of the most common are:
nn.ReLU- also known as rectified linear unit.nn.Sigmoid- also known as the sigmoid function.nn.Softmax- also known as the softmax function.
Note: See 02. PyTorch Neural Network Classification for more.
# ReLU
relu = nn.ReLU()

# Sigmoid
sigmoid = nn.Sigmoid()

# Softmax
softmax = nn.Softmax()
Loss Functions
A loss function measures how wrong your model is. As in, how far are its predictions off where they should be.
Ideally, with training, data and an optimization function, this loss value goes as low as possible.
Loss functions in PyTorch (and deep learning in general) are also often referred to as: criterion, cost function.
PyTorch has several loss functions built into torch.nn.
And some of the most common are:
- nn.L1Loss - also referred to as MAE or mean absolute error (this loss is often used for regression problems or predicting a number such as the price of houses).
- nn.MSELoss - also referred to as L2Loss or mean squared error (this loss is often used for regression problems or predicting a number such as the price of houses).
- nn.BCEWithLogitsLoss - also known as binary cross entropy this loss function is often used for binary classification probelms (classifying something as one thing or another).
- nn.CrossEntropyLoss - this loss function is often used for multi-class classification problems (classifying something as one thing or another).
# L1Loss
loss_fn = nn.L1Loss() # also known as MAE or mean absolute error

# MSELoss
loss_fn = nn.MSELoss() # also known as MSE or mean squared error

# Binary cross entropy (for binary classification problems)
loss_fn = nn.BCEWithLogitsLoss()

# Cross entropy (for multi-class classification problems)
loss_fn = nn.CrossEntropyLoss()
Optimizers
An optimizer's job is to change the neural network weights in such a way that it reduces the loss function value.
PyTorch has several optimization functions built into the torch.optim module.
Two of the main optimizer functions include:
- torch.optim.SGD(lr=0.1, params=model.parameters()) - SGD also known as stochastic gradient descent (
lrstands for "learning rate", the multiplier of how much to modify neural network weights at each step, small value = small adjustments, big value = big adjustments). - torch.optim.Adam(lr=0.001, params=model.parameters()) - The Adam optimizer (
paramsstands for "model parameters", in other words, the model parameters/weights you'd like the optimization function to optimize during training).
# Create a baseline model
model = nn.Transformer()

# SGD (stochastic gradient descent)
optimizer = torch.optim.SGD(lr=0.1, # set the learning rate (required)
                            params=model.parameters()) # tell the optimizer what parameters to optimize

# Adam optimizer
optimizer = torch.optim.Adam(lr=0.001, # set the learning rate (required)
                             params=model.parameters()) # tell the optimizer what parameters to optimize
End-to-end example workflow
Let's put everything together in a quick end-to-end workflow.
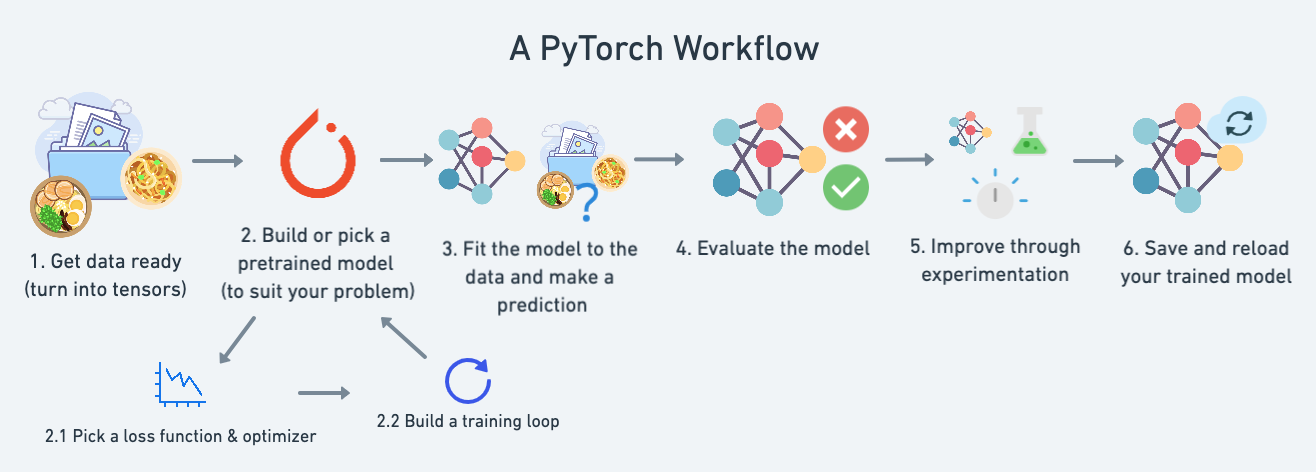
This workflow has been taken from 01. PyTorch Workflow Fundamentals.
Create data
# Create *known* parameters
weight = 0.7
bias = 0.3

# Create data
start = 0
end = 1
step = 0.02
X = torch.arange(start, end, step).unsqueeze(dim=1) # data
y = weight * X + bias # labels (want model to learn from data to predict these)

X[:10], y[:10]
# Create train/test split
train_split = int(0.8 * len(X)) # 80% of data used for training set, 20% for testing
X_train, y_train = X[:train_split], y[:train_split]
X_test, y_test = X[train_split:], y[train_split:]
len(X_train), len(y_train), len(X_test), len(y_test)Create a model
Two main ways to create a model in PyTorch:
- Subclass
torch.nn.Module- more code but can be very flexible, models that subclasstorch.nn.Modulemust implement aforward()method. - Use
torch.nn.Sequential- less code but less flexibility.
Let’s start with option 1.
from torch import nn

# Option 1 - subclass torch.nn.Module
class LinearRegressionModel(nn.Module):
    def __init__(self):
        super().__init__()
        # Use nn.Linear() for creating the model parameters
        self.linear_layer = nn.Linear(in_features=1,
                                      out_features=1)

    # Define the forward computation (input data x flows through nn.Linear())
    def forward(self, x: torch.Tensor) -> torch.Tensor:
        return self.linear_layer(x)

model_0 = LinearRegressionModel()
model_0, model_0.state_dict()
Now let's create the same model as above but using torch.nn.Sequential.
from torch import nn

# Option 2 - use torch.nn.Sequential
model_1 = torch.nn.Sequential(
    nn.Linear(in_features=1,
              out_features=1))

model_1, model_1.state_dict()
Setup loss function and optimizer
# Create loss function
loss_fn = nn.L1Loss()

# Create optimizer
optimizer = torch.optim.SGD(params=model_1.parameters(), # optimize newly created model's parameters
                            lr=0.01)
Create a training/testing loop
Our goal is to reduce the loss of our model (how much our model's predictions are different to the actual data).
If our training/testing loops are implemented right and the model is capable of learning patterns in the data, the training and test losses should go down.
See the following for steps in a PyTorch training/testing loop:
1. PyTorch Optimization Loop
Click here for the PyTorch Optimization Loop song.
2. PyTorch Training Loop
For the training loop, build the following steps:
| Number | Step name | What does it do? | Code example |
|---|---|---|---|
| 1 | Forward pass | The model goes through all of the training data once, performing its forward() function calculations. | model(x_train) |
| 2 | Calculate the loss | The model's outputs (predictions) are compared to the ground truth and evaluated to see how wrong they are. | loss = loss_fn(y_pred, y_train) |
| 3 | Zero gradients | The optimizers gradients are set to zero (they are accumulated by default) so they can be recalculated for the specific training step. | optimizer.zero_grad() |
| 4 | Perform backpropagation on the loss | Computes the gradient of the loss with respect for every model parameter to be updated (each parameter with requires_grad=True). This is known as backpropagation, hence "backwards". | loss.backward() |
| 5 | Update the optimizer (gradient descent) | Update the parameters with requires_grad=True with respect to the loss gradients in order to improve them. | optimizer.step() |
3. PyTorch Testing Loop
For the testing loop (evaluating our model), the typical steps include:
| Number | Step name | What does it do? | Code example |
|---|---|---|---|
| 1 | Forward pass | The model goes through all of the training data once, performing its forward() function calculations. | model(x_test) |
| 2 | Calculate the loss | The model's outputs (predictions) are compared to the ground truth and evaluated to see how wrong they are. | loss = loss_fn(y_pred, y_test) |
| 3 | Calculate evaluation metrics (optional) | Alongside the loss value you may want to calculate other evaluation metrics such as accuracy on the test set. | Custom functions |
Note: the testing loop doesn't contain performing backpropagation (loss.backward()) or stepping the optimizer (optimizer.step()). This is because no parameters in the model are being changed during testing, they've already been calculated. For testing, we're only interested in the output of the forward pass through the model.
4. Training
Time to build a training and testing loop:
torch.manual_seed(42)

# Set the number of epochs
epochs = 1000

# Put data on the available device
# Without this, an error will happen (not all data on target device)
X_train = X_train.to(device)
X_test = X_test.to(device)
y_train = y_train.to(device)
y_test = y_test.to(device)

# Put model on the available device
# With this, an error will happen (the model is not on target device)
model_1 = model_1.to(device)

for epoch in range(epochs):
    ### Training
    model_1.train() # train mode is on by default after construction

    # 1. Forward pass
    y_pred = model_1(X_train)

    # 2. Calculate loss
    loss = loss_fn(y_pred, y_train)

    # 3. Zero grad optimizer
    optimizer.zero_grad()

    # 4. Loss backward
    loss.backward()

    # 5. Step the optimizer
    optimizer.step()

    ### Testing
    model_1.eval() # put the model in evaluation mode for testing (inference)
    # 1. Forward pass
    with torch.inference_mode():
        test_pred = model_1(X_test)

        # 2. Calculate the loss
        test_loss = loss_fn(test_pred, y_test)

    if epoch % 100 == 0:
print(f"Epoch: {epoch} | Train loss: {loss} | Test loss: {test_loss}")>>> Epoch: 0 | Train loss: 0.7185534834861755 | Test loss: 0.8503350615501404
Epoch: 100 | Train loss: 0.008362660184502602 | Test loss: 0.005596184637397528
Epoch: 200 | Train loss: 0.008362660184502602 | Test loss: 0.005596184637397528
Epoch: 300 | Train loss: 0.008362660184502602 | Test loss: 0.005596184637397528
Epoch: 400 | Train loss: 0.008362660184502602 | Test loss: 0.005596184637397528
Epoch: 500 | Train loss: 0.008362660184502602 | Test loss: 0.005596184637397528
Epoch: 600 | Train loss: 0.008362660184502602 | Test loss: 0.005596184637397528
Epoch: 700 | Train loss: 0.008362660184502602 | Test loss: 0.005596184637397528
Epoch: 800 | Train loss: 0.008362660184502602 | Test loss: 0.005596184637397528
Epoch: 900 | Train loss: 0.008362660184502602 | Test loss: 0.005596184637397528Our loss value goes down! That means our model and training setup are working!
Extras
You can find this cheatsheet as a runnable Jupyter/Google Colab notebook on the Zero To Mastery PyTorch for Deep Learning GitHub.
Note: If you’re stuck with something, one of the best ays to get help for PyTorch specific functions and use cases is to search "pytorch how to make a convolutional neural network" or "pytorch transformer layers" or "pytorch loss functions". I do this regularly.
Here are some good places to find out more:
- PyTorch official cheatsheet.
- Zero to Mastery Learn PyTorch course - a comprehensive yet beginner-friendly deep dive into using PyTorch for deep learning all the way from the fundamentals to deploying a model to the real-world so other people can use it.
- PyTorch performance tuning guide - a resource from the PyTorch team on how to tune performance of PyTorch models.
- PyTorch Extra Resources - a curated list of helpful resources to extend PyTorch and learn more about the engineering side of things around deep learning.
- Effective PyTorch by vahidk - a GitHub repo with a fantastic overview of some of the main functionality in PyTorch in a straight-forward manner.